As we can see in current Mobile Application Development trends, Flutter has gain rapid growth in short span of time compared to any other mobile application development frameworks. Having ready-to-deploy or ready-to-release strategy is one of the best practices that an organization follows. In technical terms, this is called Continues-Integration & Continues-Deployment (CI-CD). In this 4 part series, we’ll be telling you how you can setup CI-CD pipeline on Gitlab for your Flutter Application.
We’ll walk you through the following processes:
- Part 1: Configure a Flutter Application with different flavors
- Part 2: Configure Gitlab for Flutter Ci-CD
- Part 3: Configure Android Release Configurations
- Part 4: Configure iOS Release Configurations
Part 1 – Configure a Flutter Application with Different Flavors
Creating individual flavors for a Flutter Application is the practice that every organization follows to keeps development and production safe for end user. Here we’ll be creating two different flavors: ‘develop’ and ‘production’.
Flavor named ‘develop’ is the one that will be used during development of a Flutter Application. ‘Production’ will be used when we go live to end users. So, let’s see how we can setup these two flavors for both Android and iOS module of our freshly-created Flutter Application.
Flavor setup for Android module
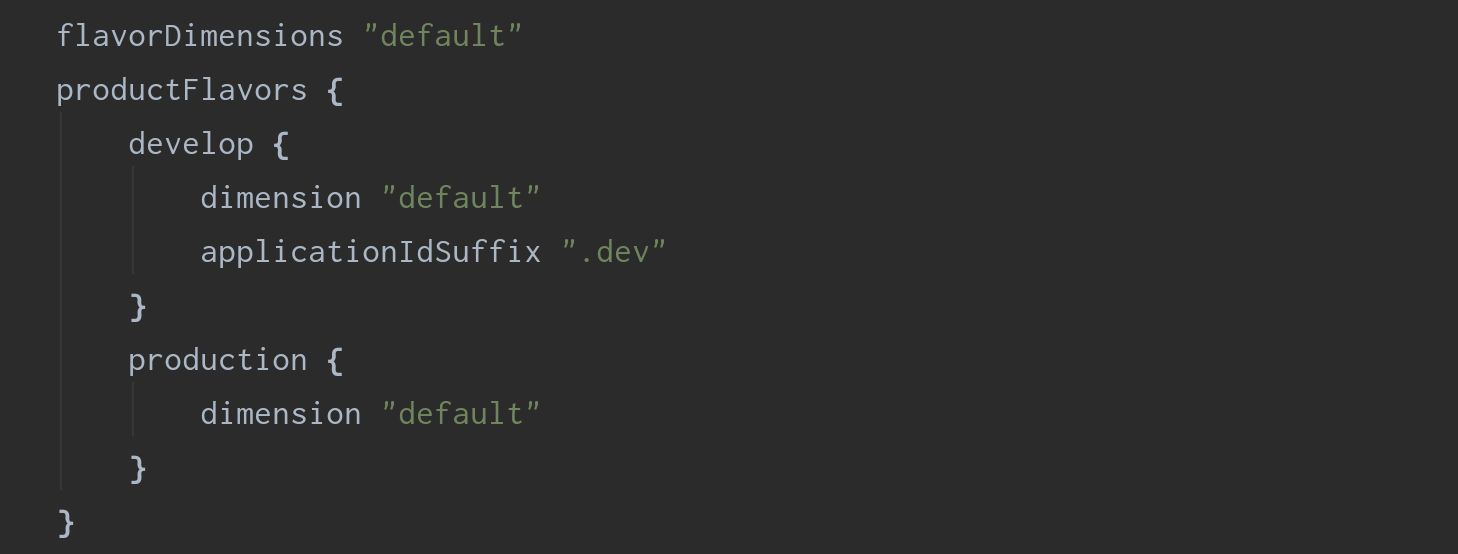
To setup two different flavor for Android module, a few lines need to be added in app’s build.gradle file right after buildTypes inside Android node. Check below code snippet:
Now our Android app module is ready with two different flavors: ‘develop’ and ‘production’. Now we’ll see how we can set this to iOS module of our Flutter Application.
Flavor setup for iOS module
Setting up flavor for iOS is bit tricky, but once you understand how it works, you will be amazed. We’ll go step by step for this whole procedure.
Step 1
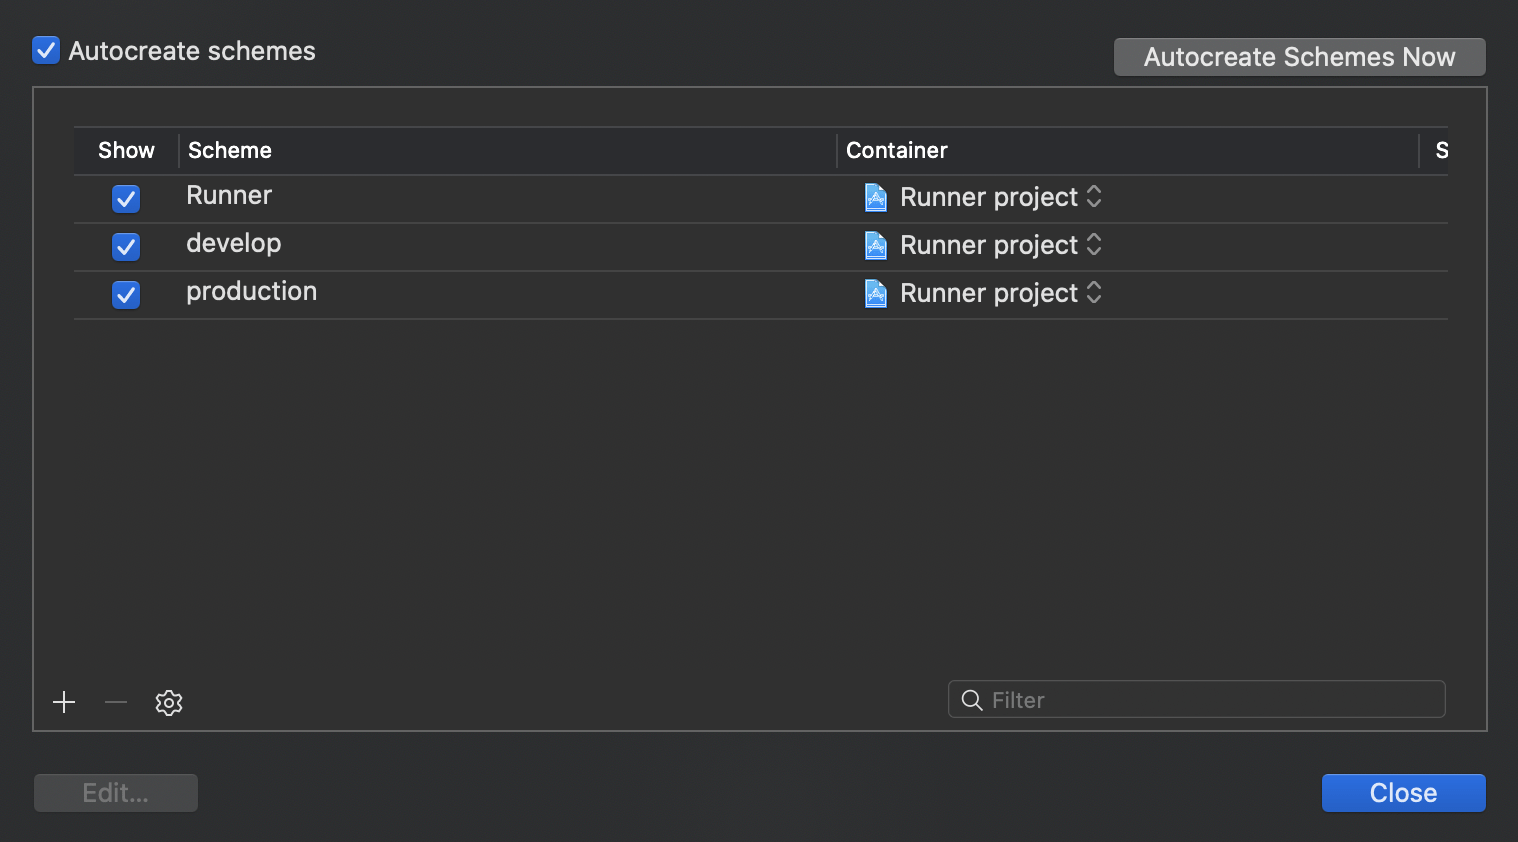
Create two schemes develop and production with xCode:
- Select Product -> Scheme -> Edit Scheme from top menu
- Duplicate main Runner scheme and name it according to our required flavors one by one
When you complete this step, you should have schemes as shown in below image:
Step 2
Now, for every scheme created, we have to add a new build configuration combined with each different build mode type (Debug, Release).
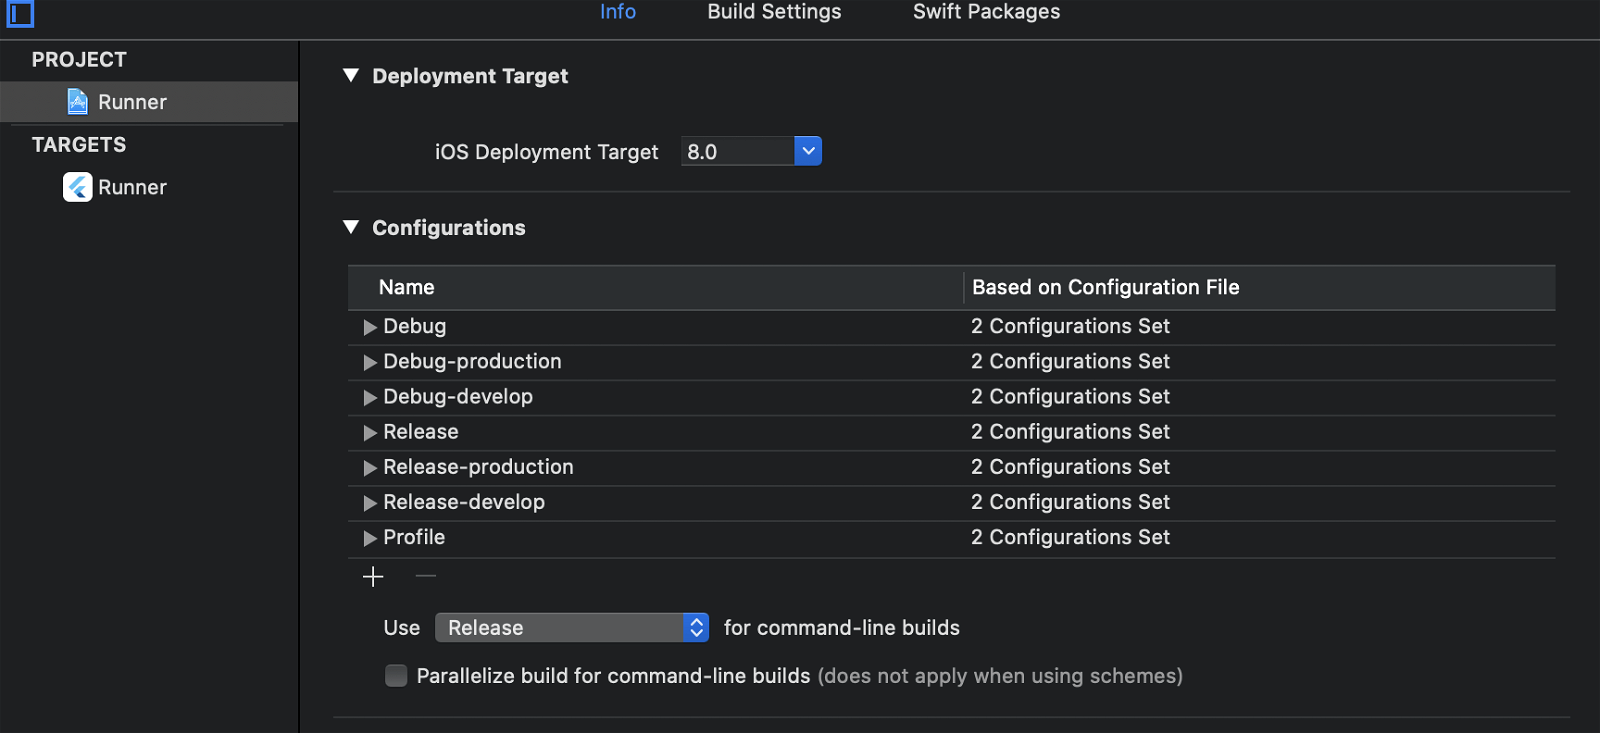
- Select Runner Project & Open Info tab
- In the Configuration section, create combination of buildType (Debug, Release) and scheme (develop, production). Debug, Profile and Release will be there by default. Leave them as it is.
When you complete this step, you should have Configurations as show in below image:
Step 3
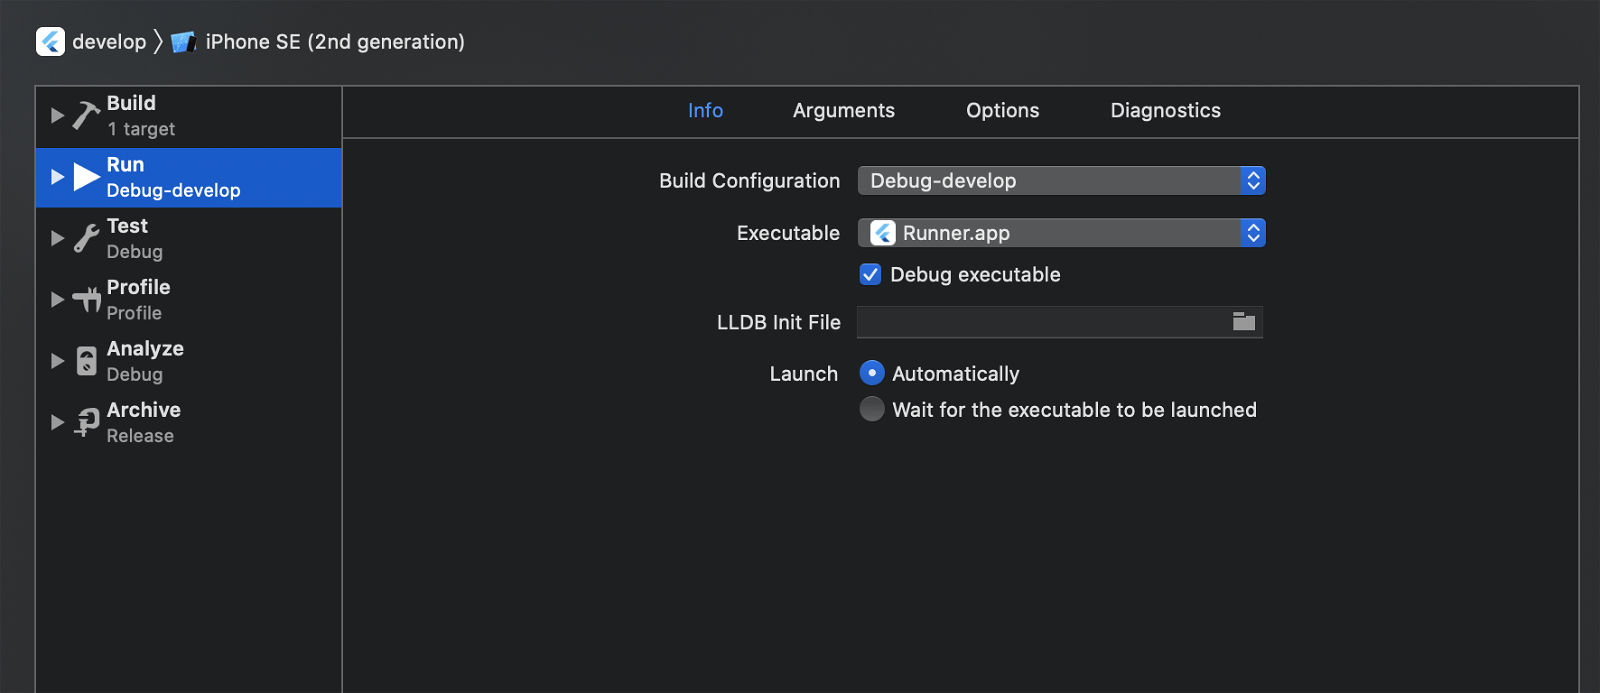
Now we’re done setting up schemes and configuration, so we’ll pair them together to enable for which scheme and build type combination and which configuration will be picked. Here we’ll be setting up for Run and Archive as of now.
- Go to Product -> Scheme -> Edit Scheme
- For a particular scheme like develop,
- For Run, select Debug-develop as Build Configuration
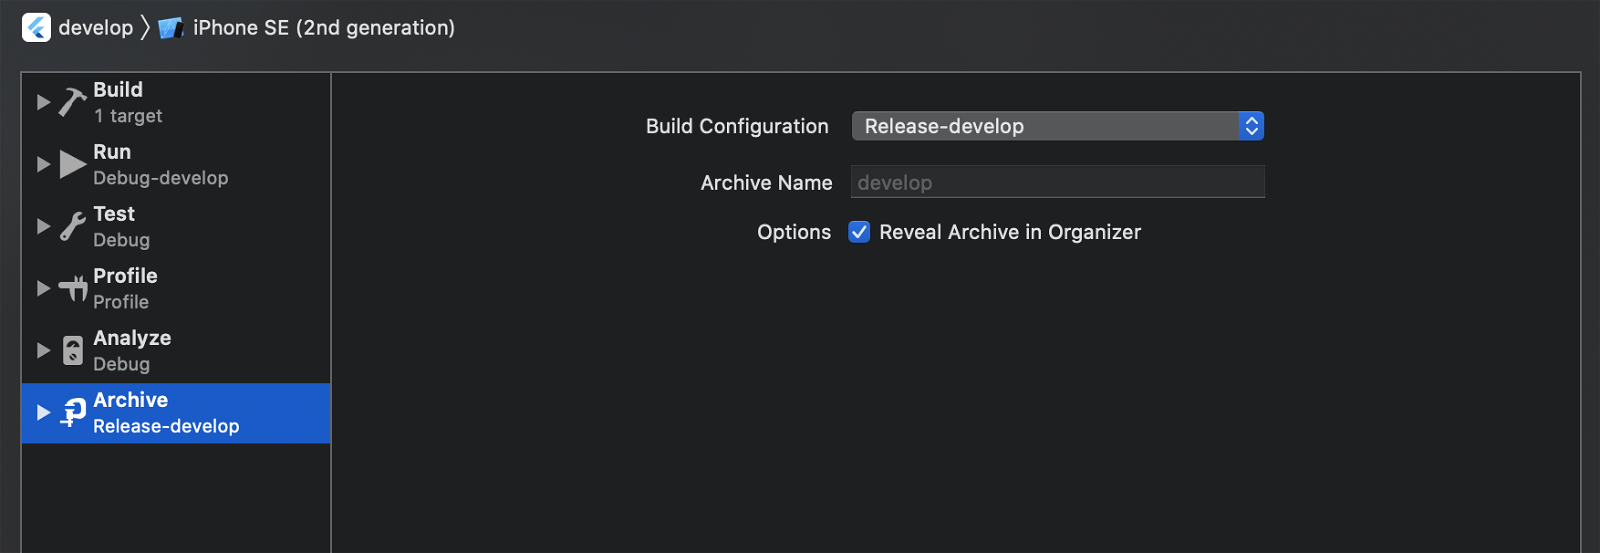
- For Archive, select Release-develop as Build Configuration
We’ve to do this for our other scheme, also. Once we’re done, we’ll get configuration setup like below images:
Finally, we’re done setting up flavors for Android and iOS modules for our Flutter application. But one main thing is remaining: how our dart Flutter Application will inform native (Android or iOS) module about which flavor it’s executing right now.
So, for this we’ll be writing a communicating method at both sides, in Dart and as well as in Native (for Android and iOS modules) which we’ll cover now in next module.
Flutter App Configuration
In previous section we’ve configured flavors in Android and iOS modules of our Flutter Application. Now we will be configuring Dart side of our Flutter Application so it will communicate with native module to which flavor it is executing or building. For this, we’ll be using Platform Channels to make communication bridge between Dart and Native code our application.
Step 1
Create a file with name app_config.dart in lib folder of our application where main.dart resides. This file will be used to configure or we can store API Base Endpoint and flavor based on our current Run Configurations.
First of all, import required packages as displayed in below image:

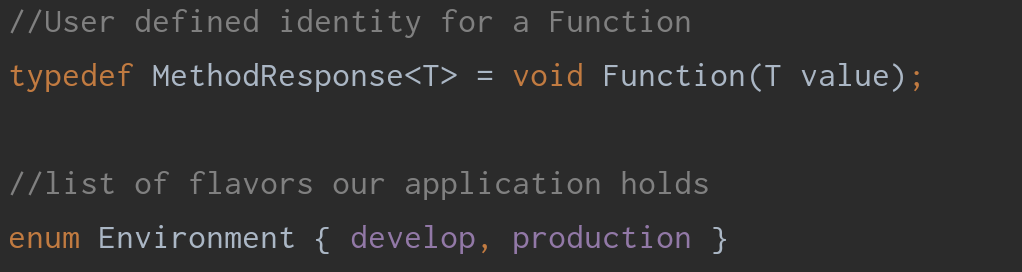
Then declare a user define function definition and declare enum Environment of values same as our definedflavors,
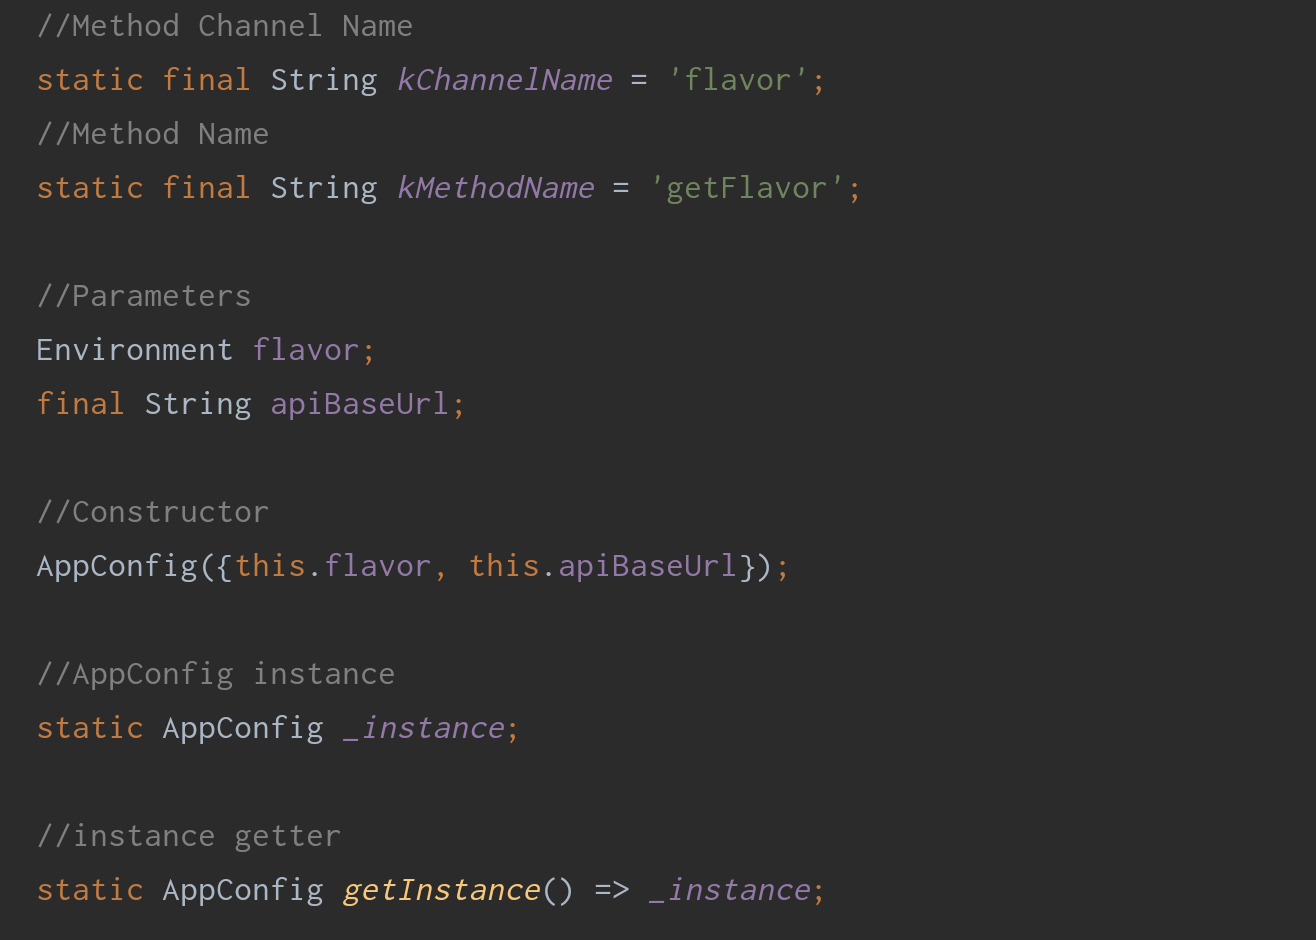
Next, we’ll be creating a class named AppConfig and declare parameters as displayed below:
We’ll be communicating with Native module via Method channel. This will notify our native modules which flavor we’re running so appropriate run configuration will be taken at the time of execution.
- kChannelName (flavor) – Name of the channel to communicate with Native module of Android and iOS
- kMethodName (getFlavor) – Method name which will be identified in native module
- flavor – will be storing value of flavor used at time of run configuration
- apiBaseUrl – Based on flavor we’ll be setting up different backend (server) URL which will be used at the time of communication.
- _instance – Private Instance AppConfig class which will be storing value for flavor and apiBaseUrlparameter.
- GetInstance – Method to retrieve value of _instance at any point throughout application’s life cycle.
Next define a method based on our define function signature as below:
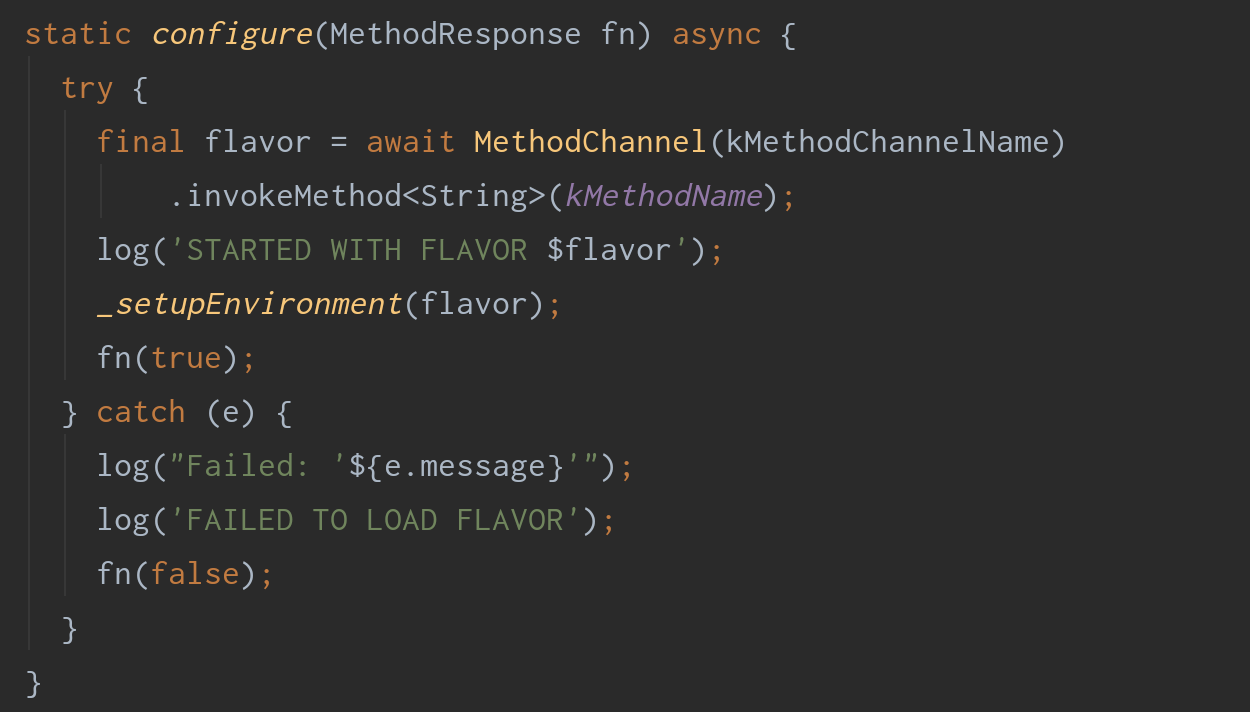
This static method will be called via an instance of AppConfig class which will perform several functions like:
- communicate with native module and get the name of flavor
- Pass retrieved flavor to another method which will setup AppConfig parameters values and store that in _instance of that class.
- If at any point Exception will take place then it will log the information about it from catch block.
Finally, we’ll add a method to setup environment as shown below:
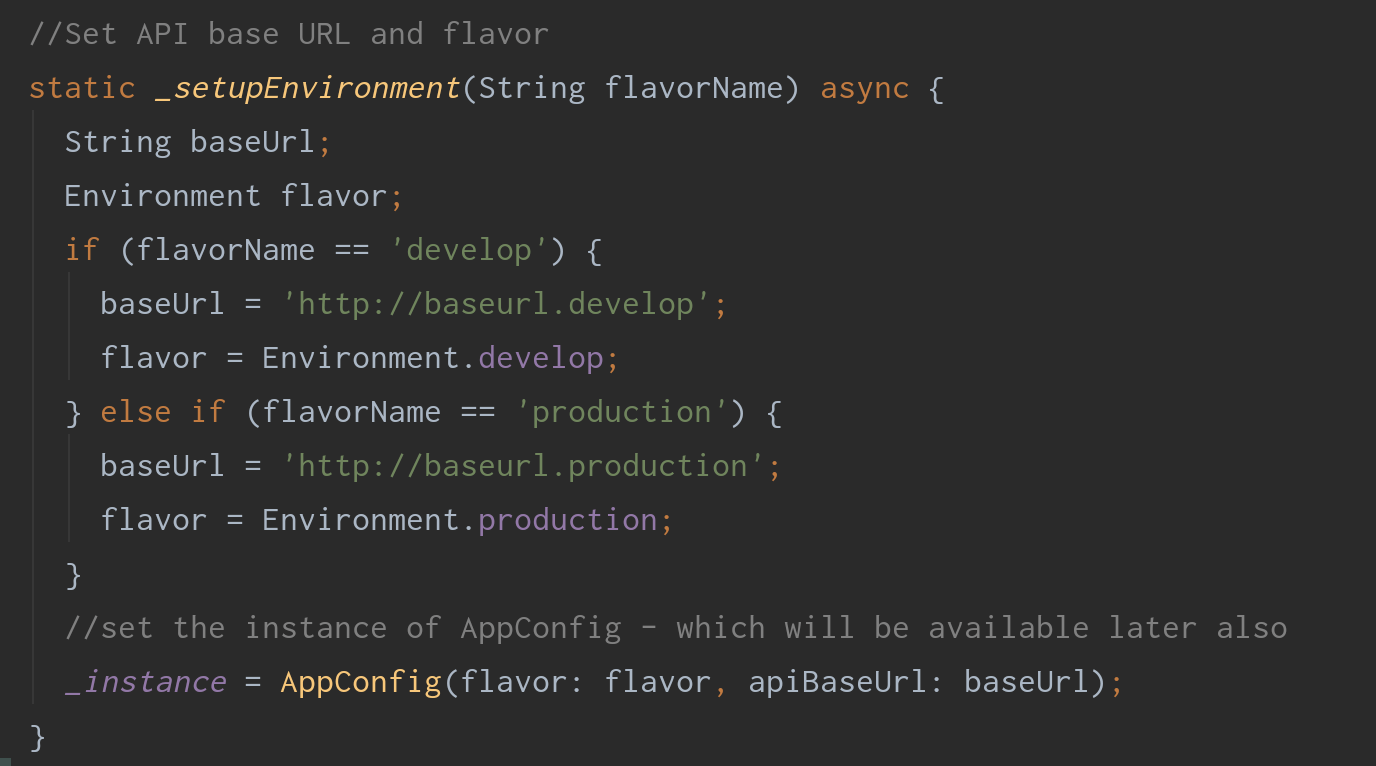
This method will create an _instance by assigning values to apiBaseUrl and flavor parameters based in flavor that it retrieves.
At the end, we require some modification to our main.dart file as shown below:

Here at the beginning of our application start-up, we’ll be checking if Flutter Widgets are initialized or not by a single line call. Then we’ll make an await call to our AppConfig class configure method to get flavor according to run configuration and setting up environment according to it and send back result as true or false. If the result is true, we’ll be forwarding execution to start our application.
Step 2
In this step we’ll do modification to native modules, so they can handle method channel call from dart side. Let’s check that out one by one.
Android
Open MainActivity.kt file from folder android -> app -> src -> main -> kotlin -> PACKAGE -> MainActivity.ktand include the changes as displayed in below image:
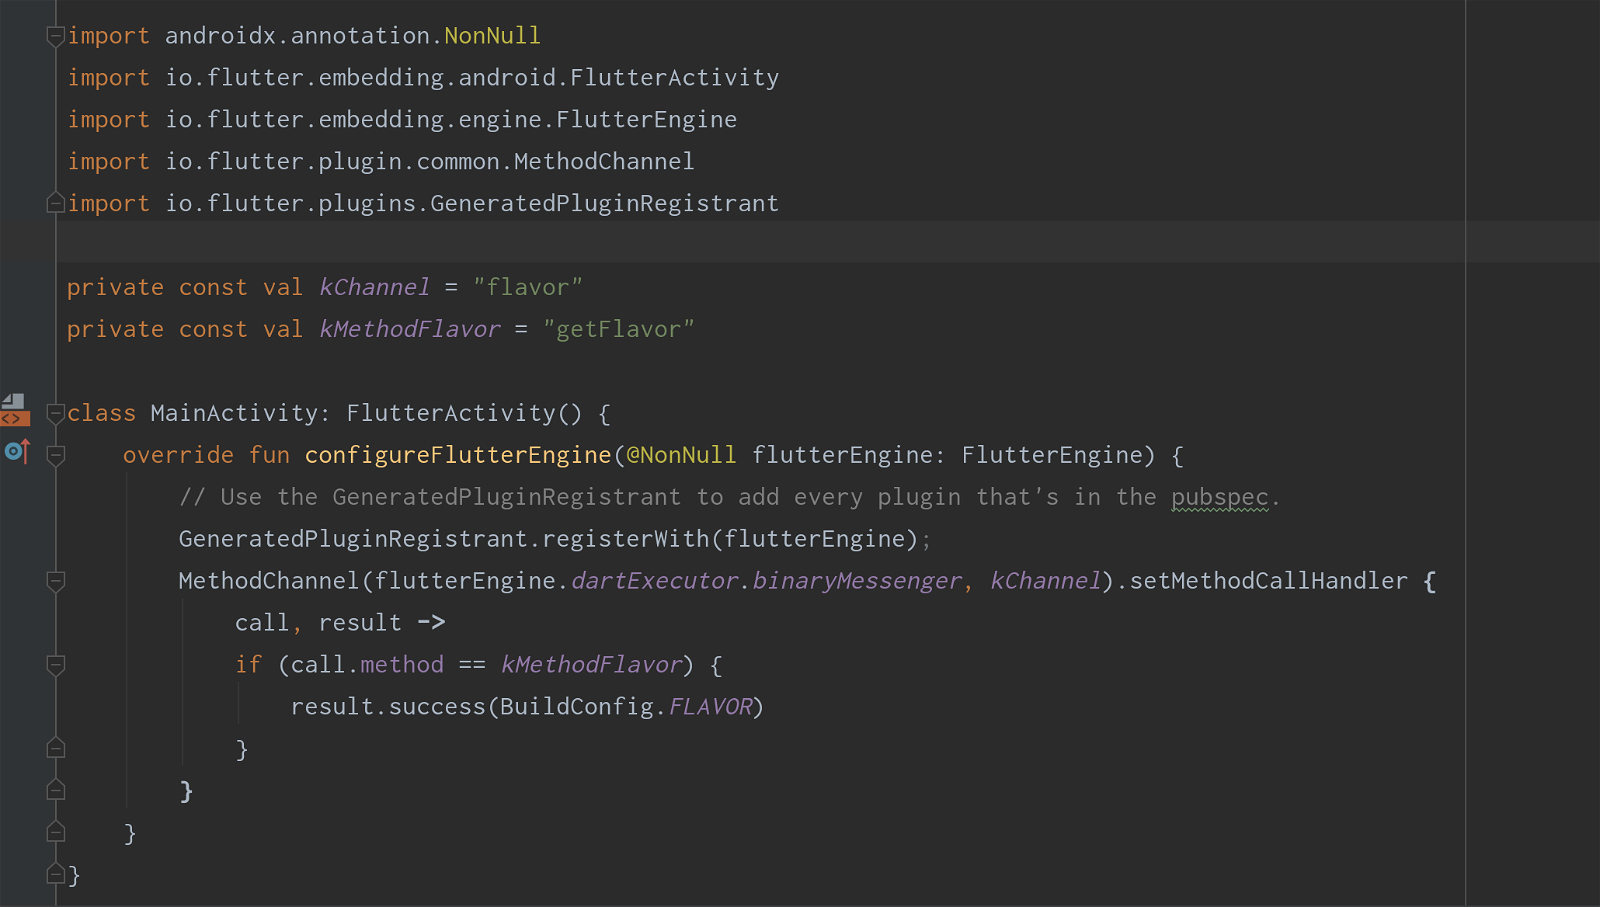
As we require to handle method channel call here on Android native side, we’ll be importing a few required packages first. Then we’ll declare channel name and method name the same as we have taken for our Flutter Dart application.
Next, we’ll be adding handling part of this method call for which we have to override a function namedconfigureFlutterEngine. Inside which we’ll be declaring method channel handler using setMethodCallHandlemethod of MethodChannel class by passing a required parameter and channel name. Further, we’ll be checking which method call has been made and according to it, we’ll reply with an instance of result containing value of Flavor that our app is configuring as per Run Configuration.
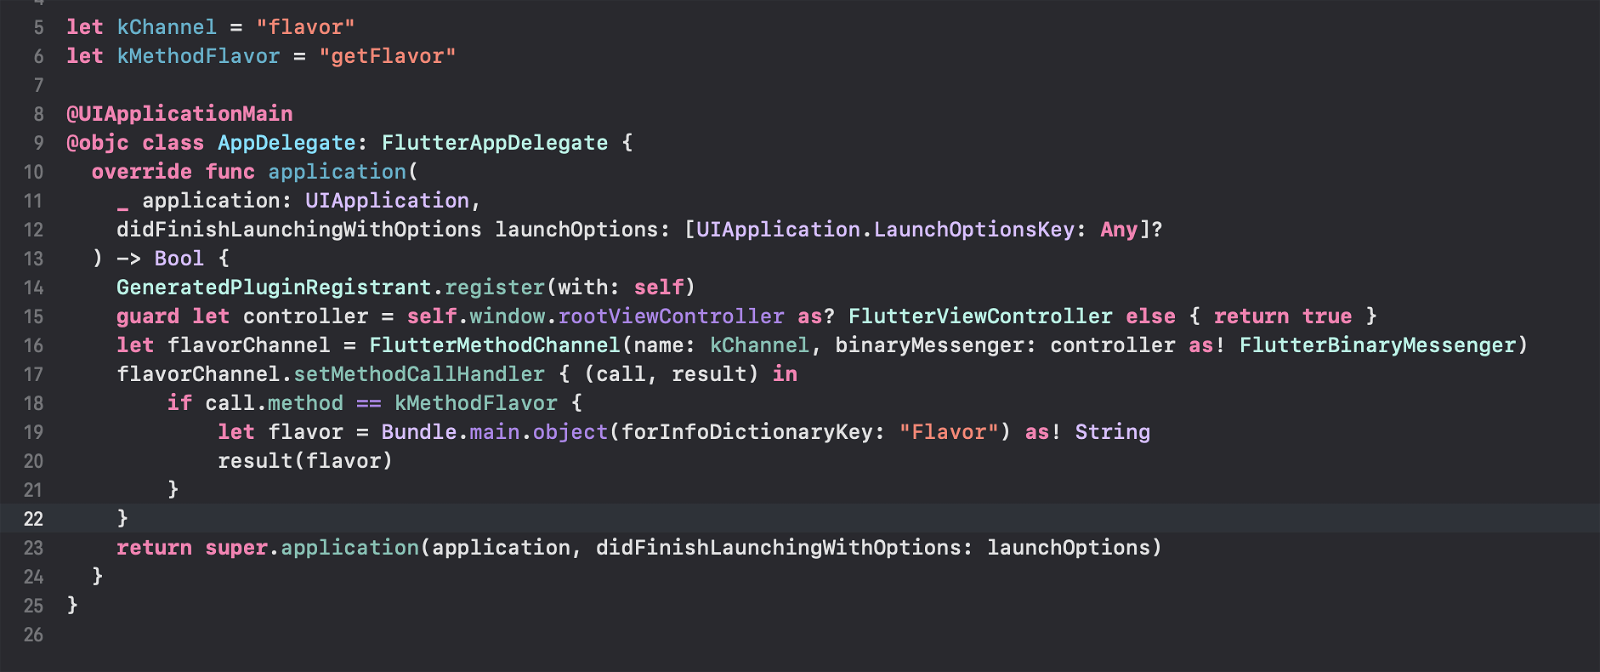
iOS
Configuring iOS module is straight forward but require precise changes so take time to be accurate. First of all, open AppDelegate.swift file and make the changes same as displayed in below image. It’s the same thing that we have done to handle a method channel call for Android side. This one is the iOS side. But it requires a little bit more modification. We need to make the variable Flavor available in info.plist file.
So, in xCode open Runner/Info.plist file and add a new key named Flavor and assign value of ${PRODUCT_FLAVOR} to it. You can check below image for it.

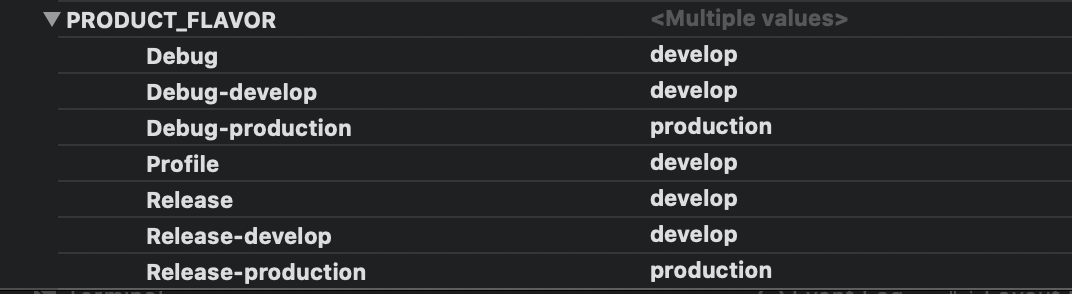
Next, we have to define the new setting for PRODUCT_FLAVOR under Targets/Runner/BuildSettings/User-Defined. Here we’ll be adding a flavor name for each configuration that we have on left side. So, make the changes as displayed in below image.
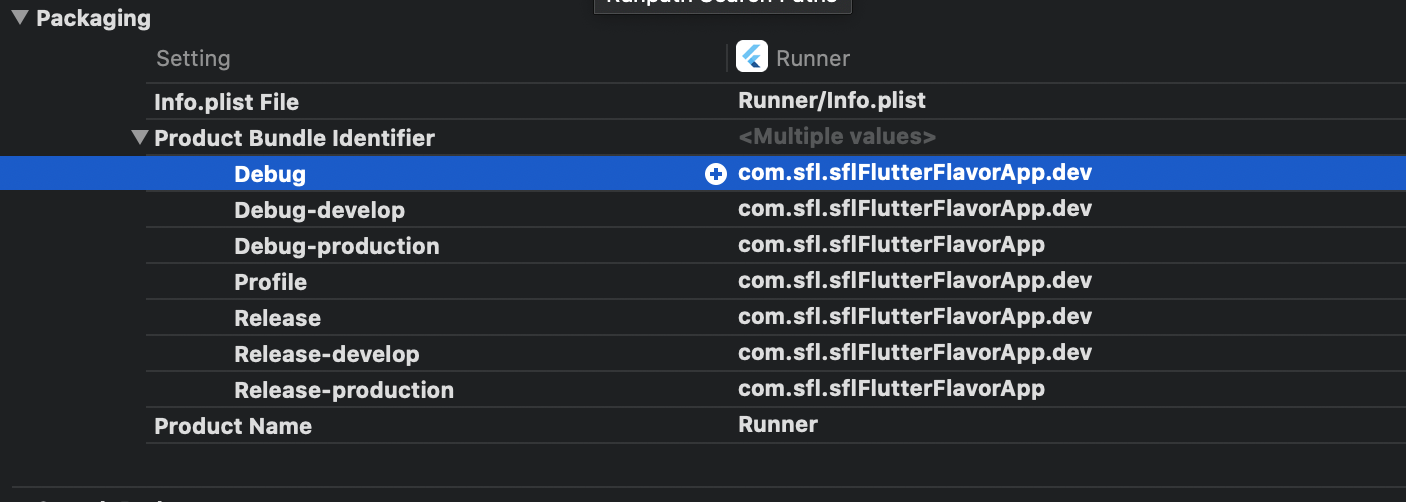
Finally, we’ll be modifying the package name as per our flavor configuration. So, move to Packaging section under same BuildSettings and modify Product Bundle Identifier values for each run configuration as displayed below:
Now,we’re ready to run our application by specifying flavor name. To do that you can use command line code as:
Flutter run —flavor develop or flutter run —flavor production
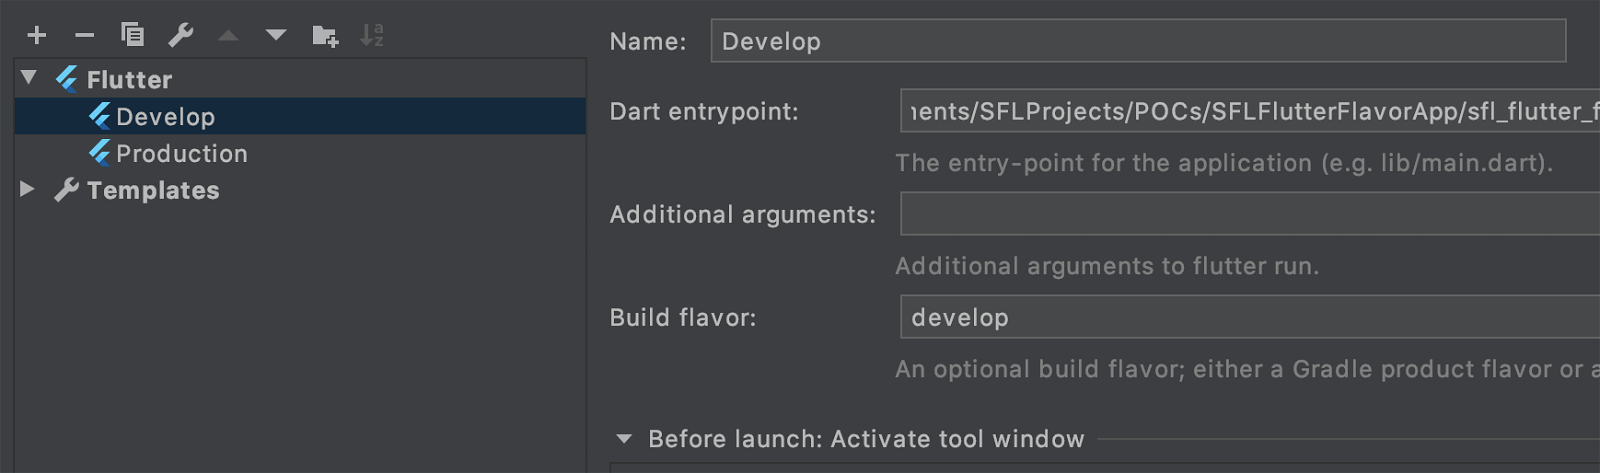
Or you can Edit Run Configuration for all the time as shown in below images:
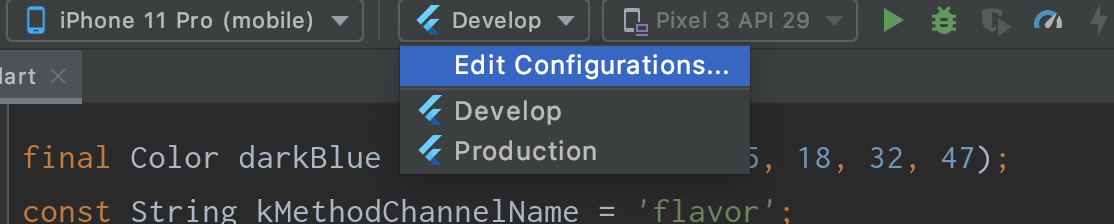
First go to Edit Configuration and then mention name of the flavor as displayed in below image for a Run Configuration. You can also name it Develop. For production, just duplicate Develop Configuration and modify its name and specified flavor as per our requirement.
Now, when you run your application by selecting a particular configuration you can also check in log whichFlavor it is executing and also you can check installed app bundle id or package id on iOS and Android device respectively. That’s it. We’re done setting up flavors for our Flutter Application.
Stay tuned for part 2!
Related Posts
Digital Transformation Strategy for 2022: First Steps, Benefits, Technology
Digital transformation is a movement to modify existing business processes to meet the needs to today’s digital age.
Android vs iOS Which Platform to Build Your App for?
Android vs iOS Which Platform to Build Your App for? Discover pros and cons, demographic information, pricing, development timeline, and…
#1 Mobile Application Development Company in New Jersey
Sunflower Lab is a mobile app development company in New Jersey. This is how we set ourselves apart from the competition.
Get a FREE estimate for your project today.
Our team of experts will review your project and give you a quote at no cost.
You might also like
Stay ahead in tech with Sunflower Lab’s curated blogs, sorted by technology type. From AI to Digital Products, explore cutting-edge developments in our insightful, categorized collection. Dive in and stay informed about the ever-evolving digital landscape with Sunflower Lab.