ListWheelScrollView – Display List of Items in a Different Way
Growing along with Flutter by knowing tones of building blocks of UI called ‘Widgets’, gives us goosebumps when we get to know about a widget which is new for us. In this article we’ll be detailing a widget like this named ListWheelScrollView. Many of us must be aware about it and may have used it in our projects as well. To whom, this is new one, let’s go further and explore it along till the end.
ListWheelScrollView is same as ListView widget but instead of plotting children widgets on flat plane view, it will display them as such they are on a vertical circular plane getting scrolled on a wheel. Look at the default rendering of both widgets as below,
Different between these two widgets can be clearly seen from the output. Unlike ListWheelScrollView widget, ListView widget does not have any specific method which gets triggered on item selection in the middle. This is one of the advantages which is very useful to provide UI for selection of specific item. Let’s explore how we can implement it.
There are two different ways to display items in ListWheelScrollView,
- Passing list of widgets directly as children to a delegate which manage rendering lazily
- Passing a delegate of ListWheelChildDelegate to childDelegate which manage & render children lazily
Type 1
We’ll be passing list of items using List.generate() directly to children parameter of ListWheelScrollView.
***CODE***
ListWheelScrollView(
itemExtent: 80,
physics: const FixedExtentScrollPhysics(),
overAndUnderCenterOpacity: 0.5,
children: List.generate(
25,
(index) => Container(
height: 60,
width: 60,
margin: const EdgeInsets.symmetric(
horizontal: 12.0,
vertical: 4.0,
),
decoration: BoxDecoration(
borderRadius: BorderRadius.circular(
10.0,
),
border: Border.all(
width: 2.0,
color: Colors.black45,
),
),
alignment: Alignment.center,
child: Text(
‘${index + 1}’,
style: Theme.of(context).textTheme.subtitle2,
),
),
),
);
***CODE***
This will create a list of 25 items, displaying index in the middle of Container widget starting with index no 0 (for display we’ve added +1 to the index). Parameter titled itemExtent is used to define the size of each child in the main axis. Physics define the scroll physics of this list view. Parameter overAndUnderCenterOpacity define opacity for items which is above and below centre item. As we can see we have put half opacity in our case hence item in centre is visible clearly compared to other items. See below how it looks like.
- REC_01
Type 2
Another way is where we can pass a different type of ListWheelChildDelegate to childDelegate parameter of ListWheelScrollView.useDelegate constructor to display items in different way. So, let’s go through those each.
ListWheelChildListDelegate
By use of this list items will be rendering same as what we have done using Type 1. See below code and output. Using explicit list of items, we can render this view.
***CODE***
ListWheelScrollView.useDelegate(
itemExtent: 50,
physics: const FixedExtentScrollPhysics(),
overAndUnderCenterOpacity: 0.5,
childDelegate: ListWheelChildListDelegate(
children: List.generate(
20,
(index) => _containerItem(index),
),
),
);
***CODE***
- REC_02
ListWheelChildLoopingListDelegate
With use of this delegate, items will be rendered in a way where a list can be looped on a passed list. At the end of the list item, first item will be render next to it so we can loop through the item list. Check code and output below. Displays items like infinite list of items by looping over them.
***CODE***
ListWheelScrollView.useDelegate(
itemExtent: 50,
physics: const FixedExtentScrollPhysics(),
overAndUnderCenterOpacity: 0.5,
childDelegate: ListWheelChildLoopingListDelegate(
children: List.generate(
20,
(index) => _containerItem(index),
),
),
);
***CODE***
- REC_03
ListWheelChildBuilderDelegate
Delegate which renders same as Type 1 and first ListWheelChildDelegate but only difference is, it supplies children using Builder callback.
***CODE***
ListWheelScrollView.useDelegate(
itemExtent: 50,
physics: const FixedExtentScrollPhysics(),
overAndUnderCenterOpacity: 0.5,
childDelegate: ListWheelChildBuilderDelegate(
childCount: 20,
builder: (BuildContext context, int index) => _containerItem(index),
),
);
***CODE***
- REC_04
So, these is how a list of items can be represented in a different way with improved UI. We hope this article may give our readers something new to learn today. In out next article, we’ll explore more about ListWheelScrollView widget, stay tuned for it. Till then, let’s live with peace.
Flutter - Bloc to Bloc communication for improved state management
Flutter has many options for state management, and Bloc is one of the popular and recommended state management options we have. While deep-diving into Bloc, we will surely require a bloc to be communicating with other blocs to traverse data and reduce new bloc creation.
This feature called Bloc to Bloc Communication has been already provided with flutter_bloc package that we use for our Flutter Projects. Giving details at a high level, it’s a concept where, based on a state of a bloc, we can trigger events or get work from a connected bloc directly. So, Let’s get dive into it.
We will understand this feature by creating one example of a list of items. From one bloc an item will be created and in the second bloc, we’ll fetch and display items added now. The list we’ll maintain in the listing bloc.
First, Bloc for creating a list item will look like the below.
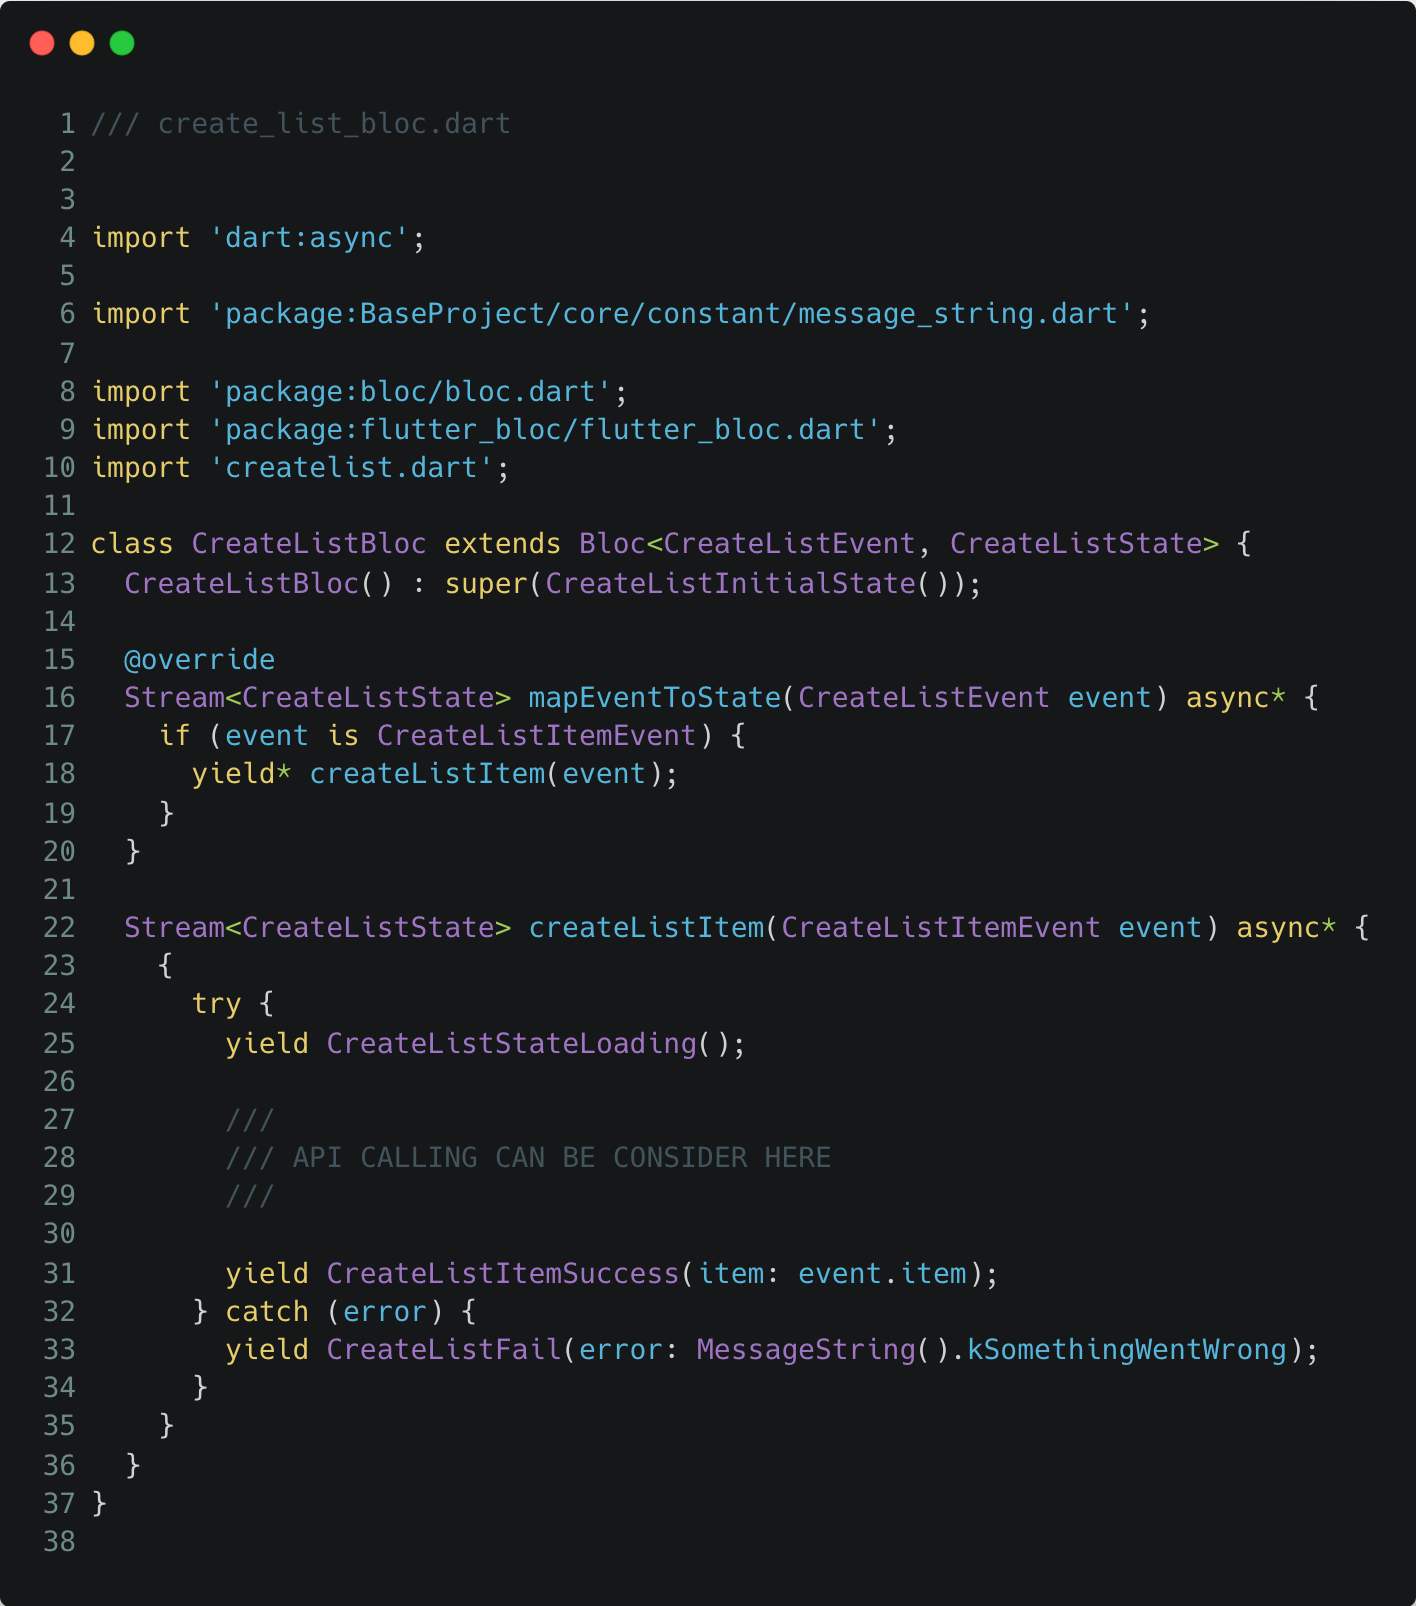
We have just created a bloc for creating a single item and created item will be passed to success state. For real app scenario, this will be through api calls.
After Success of creating an item, we have just simply yield the stage named CreateListItemSuccess(item: event.item), the state takes just the item that was just created.
Now real magic will happen in second bloc, where after creating an item, we list out all items that has been created by CreateListBloc.
In ListBloc, we will communicate with the CreateListBloc to manage all created items in a local variable and emit updated list state from ListBloc to UI to represent updated item list.
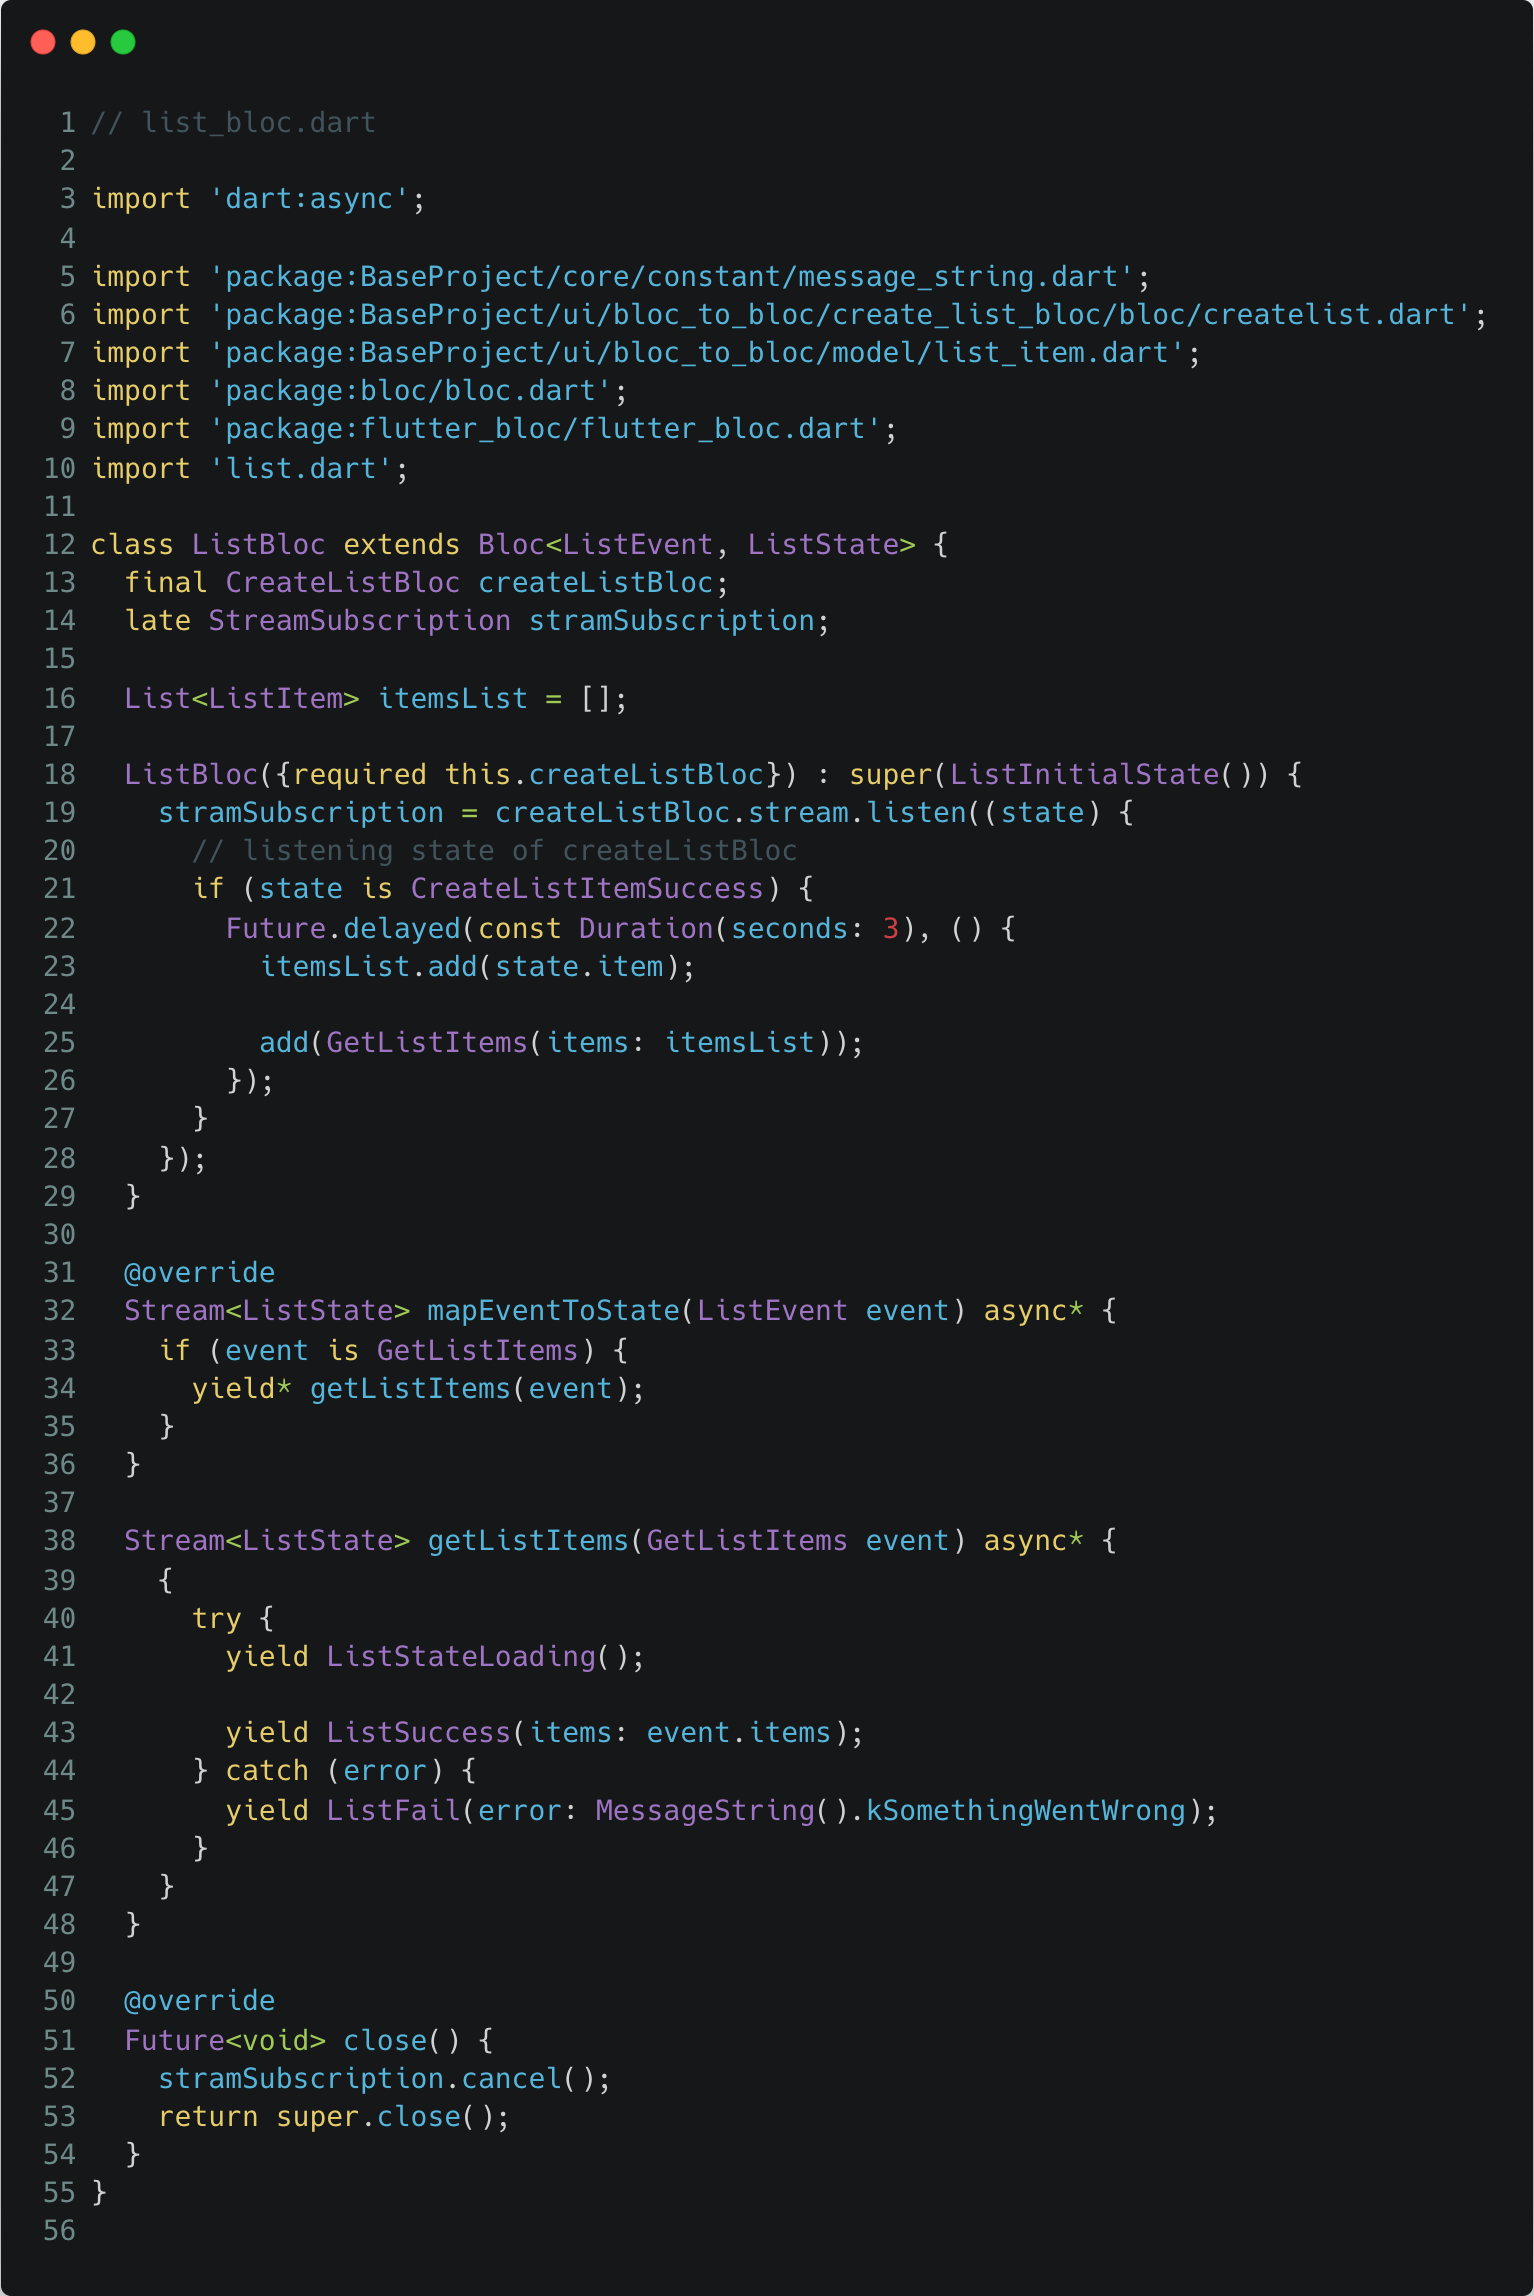
Basically, in ListBloc we have an instance of CreateListBloc and stream subscription, which will be listening to the emitting states of the CreateListBloc. As the listening state is done in constructor itself it will start listening while ListBloc instance is created.
For managing list of items, we can see that we have created one list in ListBloc as below,
List<ListItem> itemsList = [];
When CreateListBloc emit, updated state titled CreateListItemSuccess, subscribed stream will get this updated information and based on updated state and parameter values we receive, we’ll updated itemList with new value. For a key note, this can be managed via singleton also.
Once we’ve added new item into list, we can add an event named GetListItems with itemsList to ListBloc for further processing.
Next, based on added event, mapEventToState sense incoming event with data/information and emit new state titled ListSuccess with updated data.
Now, Let’s cover from UI part.
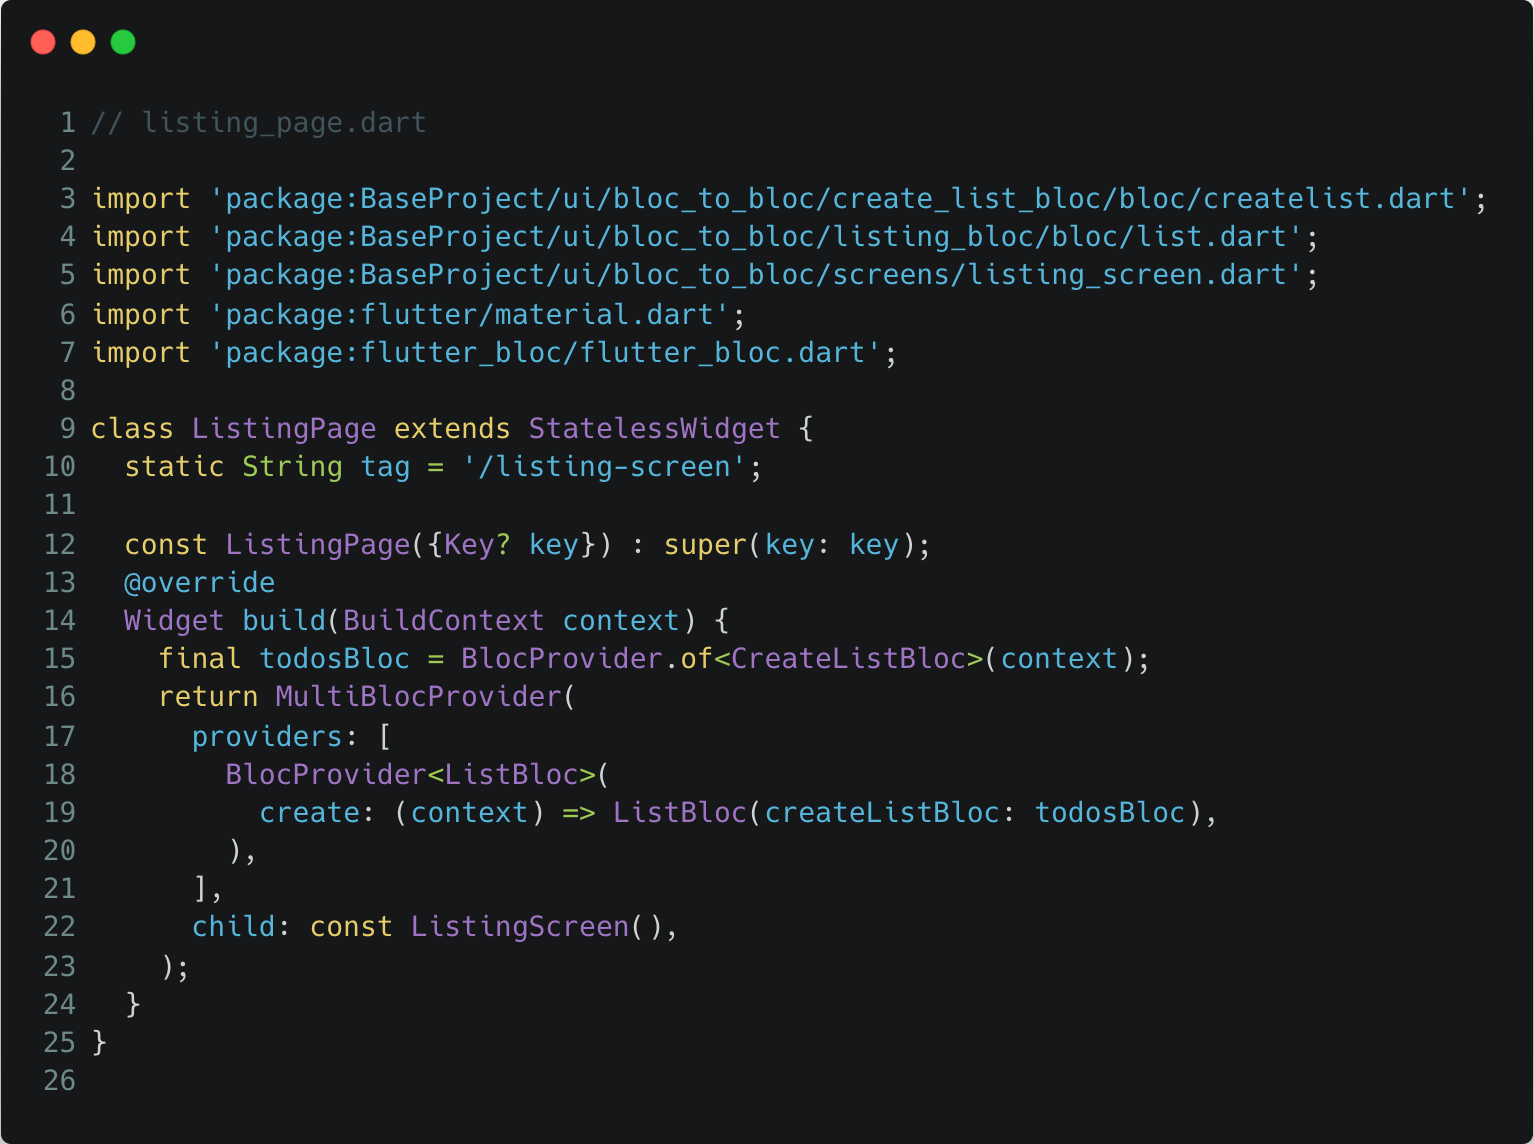
As we can see, we have created ListingPage to provide blocs to the ListingScreen & we have used MultiBlocProvider to do so.
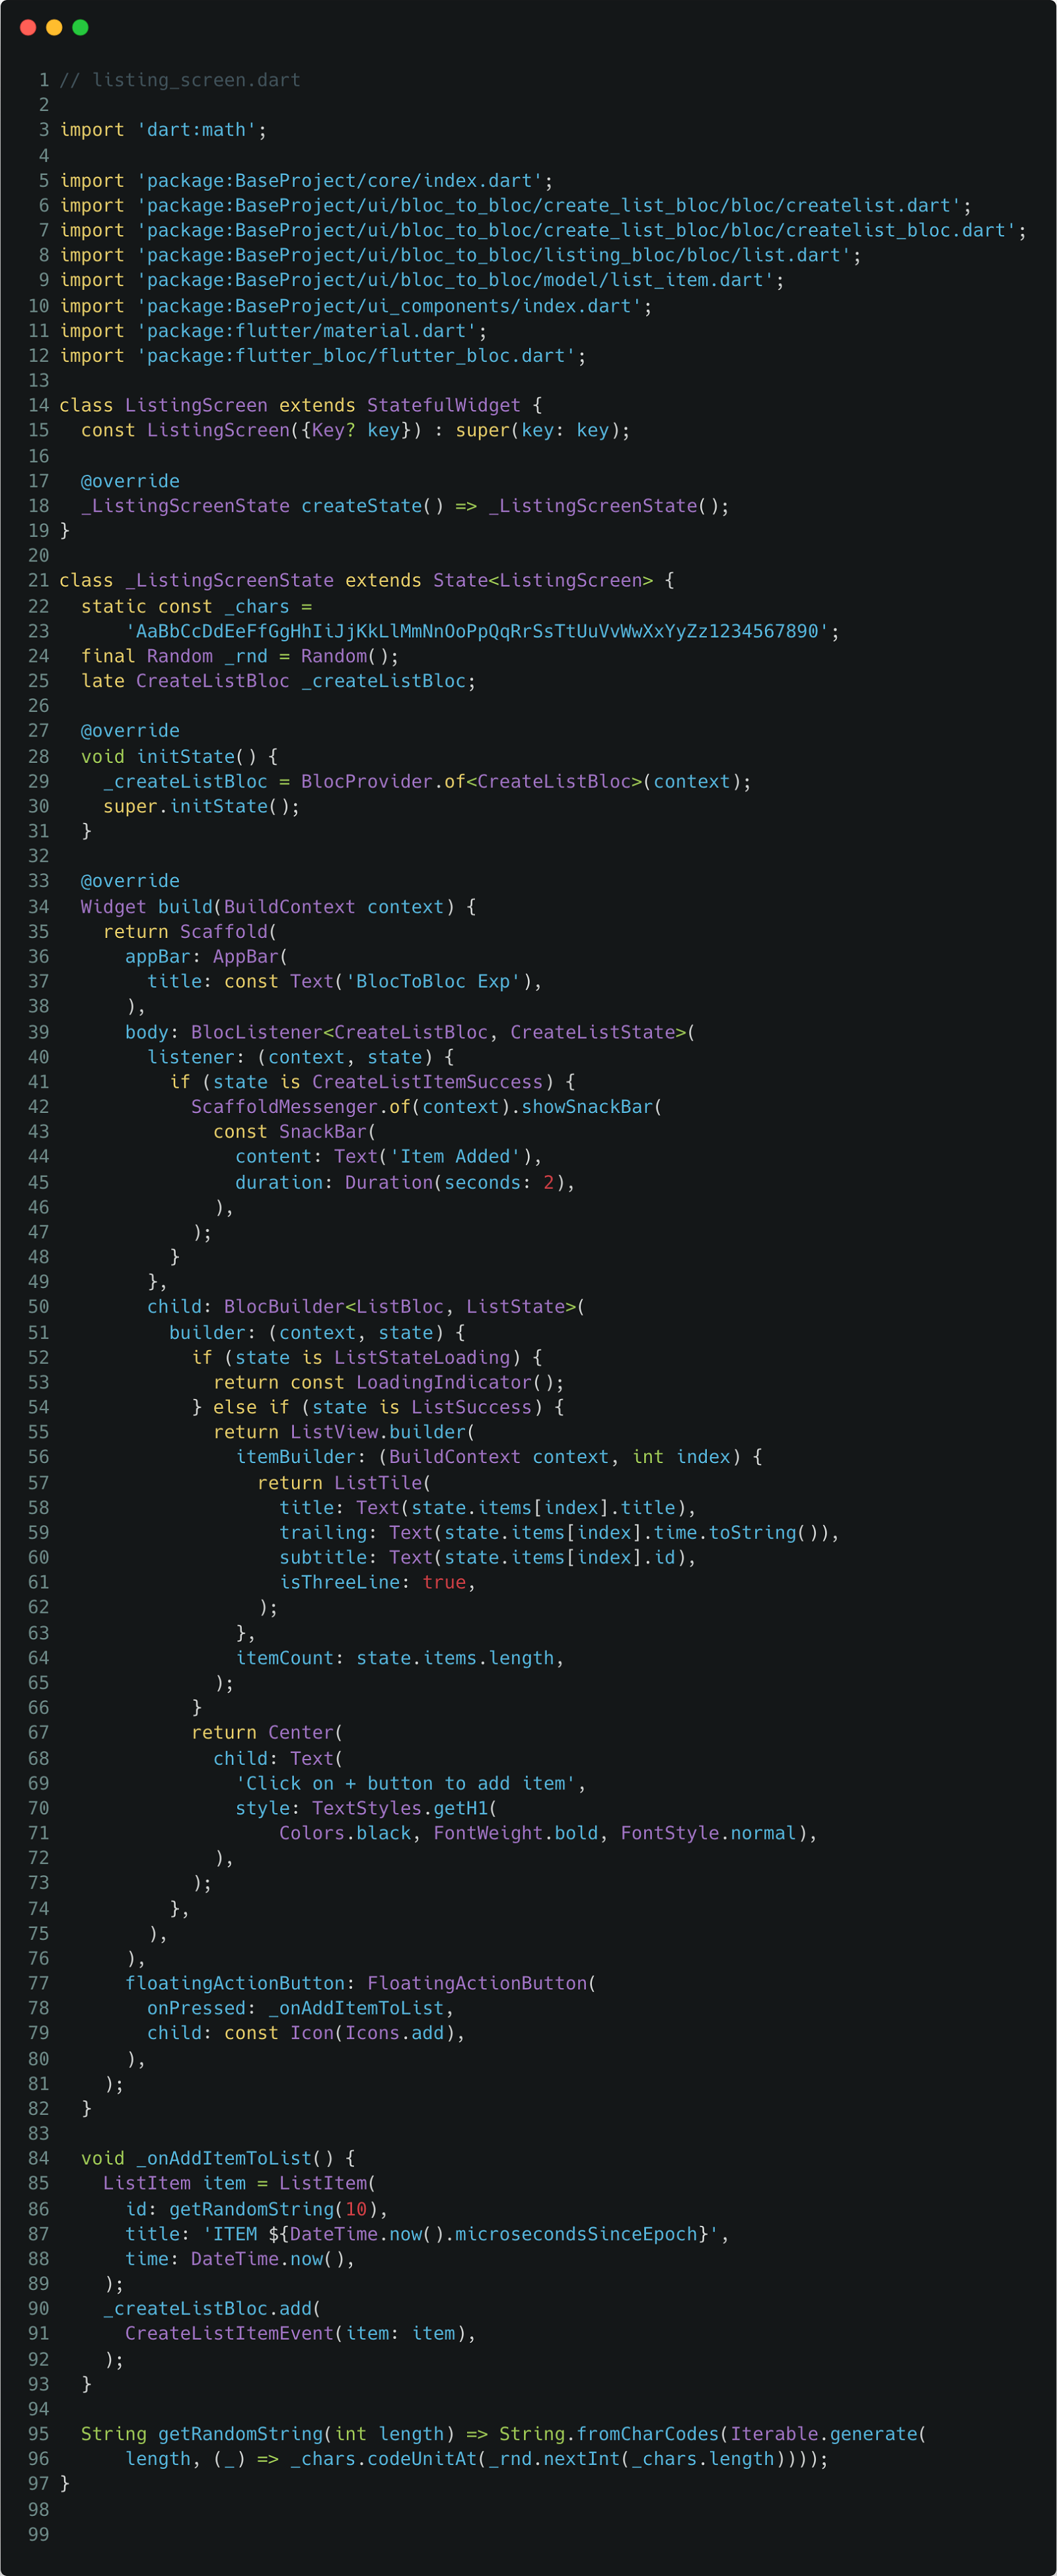
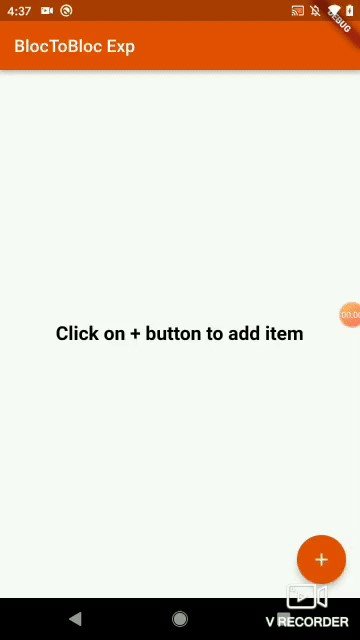
In above code, we have one list to represent all list items. For adding new item in list, we’ve FloatingActionButton and with its onPressed parameter we’ll add CreateListItemEvent event to CreateListBloc. On the success of added new item, a snackbar will be displayed. This has been achieved using BlocListener widget. (For a note: BlocListener will used to trigger any new thing while BlocBuilder used to return UI based on updated states)
To give proper understanding of flow of communication, we’ve added few delayed for adding new event and emitting new state at some place.
Here, we came to the end of this Flutter – Bloc-to-Bloc Communication article. We hope readers have get new concept and things to learn today. Try out this concept, with some cool example to break down this concept more in detail. Stay tuned for future articles. Till then Peace ☮️.
Flutter 2.8 - What’s new & improved that everyone must know.
Flutter
Finally, the good news for every flutter developer is that Flutter 2.8 is now available as stable version. Before we look into the new features and updates, we would like the readers should know, how much effort it takes to this release.
This stable version of Flutter 2.8 represents the hard work of 207 contributors and 178 reviewers, producing 2,424 PRs merged and 2976 issues closed. Generally, developers miss this most important part of a release. There are numbers of feature we can talk about which are announced with this release. Not covering them all but yeah, we will look into the and must to have features in this article.
Apart from flutter’s updated version, this release also came with new dart version Dart 2.15, which includes major improvements to concurrency, new language features such as constructor tear offs, enhanced enumerations, and optimizations that deliver a 10% reduction in memory utilization.
Performance Improvement
- Improved application’s start up time and splash screen time are most eye catchy improvements for developers as well as the users.
- Flutter team has looked into start-up time to get it reduce as much as possible. Additionally, they tested app that has global coverage and over 1 million users i.e., Google Pay. What next then? The results were quite interesting & like, 50% time is reduced when running on a low-end device, and by 10% improvements on high-end devices.
- Profiling the deployed app is the most common check for developers and it must needed feature for every flutter developer. So, now in profile they bring new updates i.e. This release now sends tracing events to the Android systrace recorder if it is enabled at application startup, and these events are sent when the Flutter application is built in release mode.
Web platform views
- In this release, not only Android and iOS is getting performance improvements but Flutter Web improvements are also included.
- Flutter web implements the HtmlElementView widget, which allows us to host HTML elements inside our Flutter web app. If we’re using the web versions of the google_maps_flutter plugin or the video_player plugin, or we’re following the Flutter team’s advice about how to optimize the display images on the web, then we’re using platform views.
Google Ads of Flutter Ads
- As Flutter releases the Google Mobile SDK for general availability in November.
- Now it came up with 5 ad formats to add ads as per our requirements and, includes a beta of a new mediation feature to help us optimize ad performance in better way.
- If we’re willing know more about integrate Google Ads into our Flutter apps as well as other monetization options, check out the new monetization page on flutter.dev.
Flutter with Firebase
- Developing apps in flutter without having a Firebase feature in it is not happing any more & for that all thanks go to flutter fire with coverage of two-third of apps in the market.
- All Flutter Fire beta plugin now moved to stage from beta quality. Plugins moving to stable for Android, iOS, and web include Analytics, Dynamic Links, In-App Messaging, Performance Monitoring, Realtime Database, Remote Config and, the new kid on the block, Installations.
- Big News for Flutter Beginners is now Flutter Fire is enabled in Dart Pad, so they can play it around with firebase features in dart pad only.
- Summarizing it for every flutter + firebase enthusiastic about what we’ve from this release, it’s listed below what make it easier to build applications using Flutter and Firebase:
- All Flutter Fire plugins are graduating from beta to stable
- New support in Dart Pad for several Firebase services
- New libraries to more easily build UI for authentication and live Firestore queries
- New Firestore Object/Document Mapping for Flutter, available in Alpha
Flutter Favorites
- The Flutter Ecosystem Committee has met again to designate the following as Flutter Favorite packages:
- Three custom router packages for the new Router API: beamer, routemaster, and go_router
- drift, a rename of an already capable and popular reactive persistence library for Flutter and Dart, built on top of sqlite
- freezed, a Dart “language patch” to provide a simple syntax for defining models, cloning objects, pattern matching, and more
- dart_code_metrics, a static analysis tool that helps us to analyze and improve our code quality.
- And several great looking GUI packages: flex_color_scheme, flutter_svg, feedback, toggle_switch, and auto_size_text
At the end, just to summarize if, this update comes with great improvements and optimization in Flutter for flutter developers and obviously we know under the hood there is lots of it.
Get a Free Quote On your Project today!
Your idea is 100% protected by our Non-Disclosure Agreement
Related Posts
Enrich Employee Onboarding Process with Automated Email Data Extraction and Entry
Employee expense receipt management is the perfect process for RPA because it is logic based and redundant. Let’s look at an example.
Return 15% of Workday Back To Employees by Automating Patient Letter Process
Employee expense receipt management is the perfect process for RPA because it is logic based and redundant. Let’s look at an example.
Eliminate EHR Fatigue, Speed Up Claims Workflow with Process Automation for Medical Billers
In this process automation example, we demonstrate how RPA can be used to automate the process of syncing health data in the hospital…
Flutter: Using Firebase In-app Messaging
What is Firebase In-App Messaging?
Firebase contains different unique services for different technologies like Web, Backend, Mobile and much more. All of these services have their own specific domain to provide better quality or improvised version of our product. One service called Firebase in-app messaging is a unique way to engage user by displaying customizable contextual messages to let them use unique app features. These messages can be targeted to specific users based on their different parameters and on specific events. These events can be triggered by Firebase Analytics or by Firebase in-app messaging itself. In this article, we’ll be looking into how we can do the basic setup for Firebase in-app messaging and get its benefits in our Flutter application for end users. So, let’s dive in.
What is Firebase In-App Messaging?
As mentioned earlier, Firebase in-app messaging can be used to provide contextual messages to end user so they can get to the unique features of our application. These unique features can be anything like buying an item, subscribing to any specific service, complete a level of game, etc. Moreover, there are different types of layouts for these in-app messages. It can be a card, or a banner, or modals, or simply an image which can be set up to display at specific time to serve its purpose maximum.
How To Set Up Firebase In-App Messaging
To get use of Firebase in-app messaging for our Flutter Applications, first we need to integrate firebase_core to our project. Follow the guidelines given in their official document here to get it done. Once done we just have to execute below command from the root of our flutter project:
```dart flutter pub add firebase_in_app_messaging ```
Once done, execute “flutter run” and we’re done with package setup.
Choose a Firebase Console Campaign
Now, to test our setup we need to compose a campaign on firebase console. Here we have to do all customization of our in-app message.
Step 1: Style & Content
In the first step, we can decide which layout we want to keep for in-app messaging to be displayed to end user. Based on content, we can decide which layout style will be better to get maximum end user engagement. Firebase will also give us representation of how it will be displayed on mobile and tablet devices for both portrait and landscape orientations. Check below:
So, using basic things we’ll be testing card layout for our message and will set up one open-source image with title and body of message. Additionally, we can also customize buttons being displayed with what will happen when user clicks on it. See configuration below:
Step 2: Target
In this step, we’ll be configuring campaign name and optional description for our future reference. Then we’ve to select eligible user criteria for whom this in-app message will be targeted. This includes different selection as below,
• App: specify which application we want to target, i.e Free version, paid version
• Languages: specify which language of users we want to target, i.e English, Dutch, Spanish
• Country/Region: specify country/region where we want to target. i.e US, Canada, India.
• User audience(s): specify users whom we want to target, i.e All Users, Purchasers or any other
Additionally, we can even specify content of in-app messages in different languages by going in localize and adding content in specific languages that we want.
Step 3: Scheduling
In this section, we have to define when we want this campaign to start and end. Also, we can specify events based on which this campaign can be triggered.
At the end of this step, we’ll be selecting frequency limit for each user for this campaign. There will be two options which are straight forward to understand.
First option, “once per device for this campaign” will display this message for only once for each user. No repetition will occur.
For second option, “no more than one message every __ day,” will display message in repetition for every specified day cycle.
Step 4: Conversion Events (optional)
In this optional step, we can track user’s interactions with this campaign that how they are reacting. We can link an event or have a new event created for the interaction of users with this event to get data for analysis.
Step 5: Additional Options (optional)
In this last step, we can mention some data information in { key , value } pair of formats to be sent with this campaign to drive the application or to fulfill purpose of this campaign as we discussed in basic introduction.
Finally, we’re done with this setup and are now ready to review and publish this campaign to mentioned targeted users. Upon clicking on publish this campaign goes live and it will be available to configured users based on selected criteria. It will be triggered selected events which will cause this in-app message to be displayed for them. So, we’re done with composing a campaign and now we’ll move forward to configure our Flutter application to trigger an event to get this campaign.
Triggering an In-App Message
By specifying title as triggering an in-app message, we mean that there are few different ways to trigger an event which will cause our campaign to display in-app message.
Using Analytics Event
We can set up firebase analytics such way that when an event take place in analytics in-app message will be triggered.
To know more about how to configure and log events using Firebase analytics check out our blog here.
Using In-App Message Programmatically
Import package, create an instance of it and trigger event using a method. Check code snipped below:
```dart import 'package:firebase_in_app_messaging/firebase_in_app_messaging.dart'; FirebaseInAppMessaging fiam = FirebaseInAppMessaging.instance; fiam.triggerEvent('some_event'); ```
Firebase In-App Messaging in Action
When we put everything to work together, how the action will be, check that in below gifs. For demo, we’ve tweaked out existing project to trigger an event on forgot password button click and as soon as that event triggered our campaign will display in-app message to the user.
So, this is how we can have Firebase in-app messaging integrated to our Flutter application and get the best out of it to have more interactions from users via different campaigns and much more. Checkout the official Firebase website to know more about it. Hope our readers have received new things today to learn.
Get a FREE quote on your project today!
Your idea is 100% protected by our Non-Disclosure Agreement
Related Posts
10 Essential Real Estate App Features that Enhance Your Business
Employee expense receipt management is the perfect process for RPA because it is logic based and redundant. Let’s
Guide To 7 Best Tech Stack 2023 for Software Development
Employee expense receipt management is the perfect process for RPA because it is logic based and redundant. Let’s
Why Outsource Java Development for Business Success in 2023
Employee expense receipt management is the perfect process for RPA because it is logic based and redundant. Let’s
How to Add Firebase Analytics to Your Flutter App
Having firebase integrated to our Flutter applications has brought us many advantages. Firebase analytics get us more in-depth details of application details like active users, top conversation events, daily user engagement, crash free user percentage and more. Even for more, we can filter this all on the basis of Platform, Stream, Users custom data (like Gender, Age and etc.) & Signed in Status also. So, let’s start understanding how to integrate firebase analytics for a Flutter Application and get best use of generated analytics.
In this article, we’ll go over:
- firebase analytics integration
- gathering user properties
- tracking of events
Firebase Analytics Integration
To integrate firebase analytics for our flutter project, follow steps provided here in their official details. Before integrating analytics, we have to integrate firebase core to our flutter project.
Firebase Analytics Integration
Once done we’re ready to move ahead with new steps. Now define a new class named FirebaseAnalyticsService and put below displayed code.
import 'package:firebase_analytics/firebase_analytics.dart'; import 'package:firebase_analytics/observer.dart'; class FirebaseAnalyticsService { final FirebaseAnalytics _analytics = FirebaseAnalytics(); FirebaseAnalyticsObserver appAnalyticsObserver() => FirebaseAnalyticsObserver(analytics: _analytics); }
Now register this class in our servicelocator file:
serviceLocator.registerLazySingleton(() => FirebaseAnalyticsService());
From this point, our FirebaseAnalytcicsService class is ready to use for different usage of Firebase Analytics.
Screen View Tracking
In our FirebaseAnalyticsService class we have FirebaseAnalyticsObserver added which can be added to navigatorObservers to track screen view events. See the code below to do that.
navigatorObservers: [ serviceLocator<FirebaseAnalyticsService>().appAnalyticsObserver(), ],
After specifying class in navigatorObservers run the app and start moving around the different screens inside app. As of now we do have 3 screens where we can move around, Login, Register and Forgot Password. Once we do that, we can check reported events in section titled Realtime under Analytics portion on Firebase Console.
To get to this Realtime Events view, go to Realtime section and click on Events at bottom left corner. Now click on Top Event section on right of it and click on screen_view & choose firebase_previous_screen. Here we’ll get the details of screens which we have moved around on our device during app usage.
Track User Properties
Another benefit of having firebase analytics is we can track user properties like id, type of login, role & etc and get that information on analytics at Firebase console.
First, we’ll track user id and to simulate this flow we can put some delay before moving ahead with registering user id into analytics.
To do that we have to add a function accepting a string parameter called id & will registering that as user id on analytics. See code below.
Future setUserId({@required String? id}) async { await _analytics.setUserId(id); }
Simulation can be done using below code snippet.
await Future.delayed(Duration(milliseconds: 3000)); await _analyticsService.setUserId(id: '101');
This is about user id but apart from this we can also track user defined properties like login type & role and to do that let’s accept another string parameters on same function and add that to analytics. See the updated code snippet below.
Updated Function
Future setUserProperties({ @required String? id, @required String? loginType, @required String? userRole, }) async { await _analytics.setUserId(id); await _analytics.setUserProperty(name: 'login_type', value: loginType); await _analytics.setUserProperty(name: 'user_role', value: userRole); }
Updated Function Call
await _analyticsService.setUserProperties( id: '101', loginType: 'EMAIL', userRole: 'ADMIN', );
Track Events
More with tracking user properties, firebase analytics also provide a way to track events from an application to be reported on Firebase console. Based on reported events and generated analysis future steps can be taken. Stating with common events like login and sign up which can be tracked using functions provided by analytics library itself as shown below.
Sign up Event
To report an event on user sign up, below method can be used.
Future logSignUp() async { await _analytics.logSignUp(signUpMethod: 'email'); }
Along with the reporting event, we can also send what kind of sign-up procedure a user is preferring to take better decisions in for future functionalities.
Login Event
To report an event once a user login, below method can be used.
Future logLogin() async { await _analytics.logLogin(loginMethod: 'email'); }
While reporting this event, additional details like method of login can also be sent to console to report what kind of login a user is preferring most of to take proper decision.
As we can see in above image where Debug View has been started to check real time events triggered from device while moving around in our app. Refer here to learn how we can enable debug view for our apps. Once we do that and run our application, it will start reporting event to firebase & in debug view section we’ll get all details of ongoing session.
So, in above image we’re looking at an event titled login triggered with its details where, we mentioned a parameter method of login with value equals to email. It’s clearly visible & this is awesome, right. Now let’s talk about triggering custom events.
Custom Event
Previous events were default provided by firebase analytics library and there are bunch of other such functions we can use to report events to console. Additionally, we can also log custom event to firebase console for scenarios like where user has performed some purchase, on confirming order, payment gets success with payment gateway used, going ahead with levels in game and so on. Let’s see how a custom event can be logged on console.
Future logPurchaseDone( {@required bool? paymentStatus, @required String? paymentGateway}) async { await _analytics.logEvent( name: 'purchase_done', parameters: { 'payment_status': paymentStatus, 'payment_gateway': paymentGateway, }, ); }
Above method can be used to log event when a purchase has been made along with status of the payment and payment gateway has been used. Firebase analytics provide a function called logEvent which accepts name of the event and Map<String, String> containing other parameters we would like to send along with it.
In above image we can clearly see details of event titled purchase_done reported to firebase console from the application. Additionally, event’s parameters like payment_status and payment_gateway is also reported with their value we passed from application.
So, this is how we can have user properties and trigger events which are provided by default as well as custom to the firebase console. Now, let’s talk about benefits of getting all these information.
Benefits of Firebase Analytics for Your Flutter App
Talking about benefits of gathering such details from our application to firebase console, give us ability to filter out what users are doing and what they prefer to do more within our application. Based on this analysis we can promote as well as improve our marketing strategy to engage more user audience. Let’s see a small step before ending our talk.
Based on received information, we can create a new Audience with different conditions based on values we have received. So below what we have set for login_type equals to EMAIL and user_role equals to ADMIN and it will show us result that how many users (or Audience) are falling in selected categories.
So, this is how we can integrate Firebase analytics to our Flutter Project and get user properties and event tracked down to console and build up future roadmap based on analysis we have received. Try this for your ongoing flutter projects and see what kind of reports you all are able to generate.
Hope you have got some new details today & see you later in upcoming article with more interesting stuff but until then, happy coding!
To learn more about Flutter, check out our Flutter Knowledge Base.
Get a FREE quote on your project today!
Your idea is 100% protected by our Non-Disclosure Agreement
Related Posts
10 Essential Real Estate App Features that Enhance Your Business
Employee expense receipt management is the perfect process for RPA because it is logic based and redundant. Let’s
Guide To 7 Best Tech Stack 2023 for Software Development
Employee expense receipt management is the perfect process for RPA because it is logic based and redundant. Let’s
Why Outsource Java Development for Business Success in 2023
Employee expense receipt management is the perfect process for RPA because it is logic based and redundant. Let’s
How to Create Singleton Pattern in Dart
How do you build a Singleton in Dart?
The Singleton pattern is a pattern used in object-oriented programming which ensures that a class has only one instance and also provides a global point of access to it. The first and foremost reason to use Singleton in any programming language is to replace the redundant code with a single line command. So, specifically talking about Dart (or cross-platform mobile app development tool, Flutter) there are many screens where we need to show a snack bar or a confirmation dialogue to the user. As a freshie, everyone is going to write a code to show a snack bar as shown below.
Just to show a single component, you’ll have to write this many lines. The number of lines in a single dart file increase drastically. And when a minor change comes from a design point of view, you’ll have to make those changes in all the files where you’ve used a snack bar.
The solution to this kind of problems is a singleton class, where we can define the most commonly used codes throughout the project and reuse it whenever needed.
Ways to Create a Singleton Class
There are mainly 3 ways to create a Singleton class:
- Factory Constructor
- Static Fields with a Getter
- Only Static Fields
We’ll first take a look on the most preferred and commonly-used way: Factory Constructor.
As you can see on line number no. 8, we defined a private constructor to which the memory will get allotted. Secondly, we created a private constructor to allocate the memory. Now comes the interesting part of the factory keyword. Once instantiated, it will always return the same instance whenever any public variable or method is called.
Let’s start with defining global variables in the singleton class. We are going to define this global variable in the ViewUtilities just like any other variable we define in other classes.
Moving forward with using this variable throughout the whole app, we just need to call the variable using the `.` operator i.e., as follows.
Awesome! Just like variables, we can also define methods that can be used throughout the whole app.
For the demonstration purpose, we’ll define a public method in our singleton class to multiply 2 digits and return the result as shown below.
Now that we have defined the public methods in our singleton class, we are going to access the multiply method in the similar way that we access the appName variable i.e., using the `. ` operator.
This was the basic implementation of singleton class in dart. We hope you found this article helpful. Stay connected for our future small but unique articles on programming best practices. Happy coding!
Get a FREE quote on your project today!
Your idea is 100% protected by our Non-Disclosure Agreement
Related Posts
10 Essential Real Estate App Features that Enhance Your Business
Employee expense receipt management is the perfect process for RPA because it is logic based and redundant. Let’s
Guide To 7 Best Tech Stack 2023 for Software Development
Employee expense receipt management is the perfect process for RPA because it is logic based and redundant. Let’s
Why Outsource Java Development for Business Success in 2023
Employee expense receipt management is the perfect process for RPA because it is logic based and redundant. Let’s
How To Use Updated Flutter Button Widgets
Flutter has released new button widgets for mobile app developers. Who wants to forget about RaisedButton, FlatButton, OutlineButton which provides a simple way to add buttons with or without icon on a screen for our mobile applications? To simplify it, Flutter has updated these all these to ElevatedButton, TextButton, OutlinedButton respectively with parameter as well as styling option updates. Let’s see them one by one.
ElevatedButton
Same as RaisedButton, this widget puts button with elevation on the screen. Required parameters are same, child, onPressed. Child will accept widget to be displayed on button, onPressed will accept a VoidCallBack to be called when a button been pressed/touched.
ElevatedButton( child: Text('Elevated Button'), onPressed: () { log('Elevated button clicked'); }, )
Having same code which we used for RaisedButton we can have same representation with ElevatedButton.
Now let’s talk about another replacement, TextButton.
TextButton
This one is an alternative of FlatButton, which we’re be using where a tapped action needs to be provided for Text being displayed on screen without any border, elevation or fancy decoration. Required parameters are same child and onPresseed.
TextButton( child: Text('Text Button'), onPressed: () { log('Text button clicked'); }, ),
Button will be displayed as shown below.
Let’s talk about last, replacement if OutlineButton.
OutlinedButton
We were using OutlineButton to display a tap action on screen with outline border, without filling area occupied inside this outline border. Required parameters are same, child and onPressed.
OutlinedButton( child: Text('OutlinedButton Button'), onPressed: () { log('OutlinedButton button clicked'); }, ),
Button will be displayed as shown below.
So, these was the basic details of replacement of button widgets available in Flutter to display different type of buttons for out mobile applications.
Additional Note
Button with icon which we’re using earlier are same with these updated widgets as well. To have an elevated button with icon use ElevatedButton.icon widget and pass required parameters. Same for outlined button and text button, use OutlinedButton.icon, TextButton.icon respectively. Below are the representations how they will look.
Next, now let’s talk about styling.
Styling
Styling can be provided to content being displayed on button and as well as to button itself. Previously, we were having different parameters at individual button level to decide different styling properties, but now this can be done by giving a value of ButtonStyle class to style parameter of these updated material buttons. Let’s check them out one by one.
Note: This all property works same for TextButton and OutlinedButton as well. For simplicity, only ElevatedButton is represented in further article.
textStyle
This will define styling of text being displayed on button. It accepts a value of TextStyle class to provide text styling options via MaterialStateProperty. See below.
textStyle: MaterialStateProperty.all<TextStyle>( TextStyle( fontSize: 24.0, fontWeight: FontWeight.w500, ), ),
Colors (backgroundColor, foregroundColor, overlayColor, shadowColor)
These options are available to have required color for specific place.
- backgroundColor : for button background.
- foregroundColor : for content being displayed on the button.
- overlayColor : for ripple being displayed when tapped or long pressed.
- shadowColor : for shadow of the button when elevation is greater than 0.
All of these options, accepts value of Color class via MaterialStateProperty. See below code.
backgroundColor: MaterialStateProperty.all<Color>( Colors.blueAccent, ), foregroundColor: MaterialStateProperty.all<Color>( Colors.yellow, ), overlayColor: MaterialStateProperty.all<Color>( Colors.red, ), shadowColor: MaterialStateProperty.all<Color>( Colors.green, ),
elevation
To provide z index height (elevation) to button we can assign any positive value to it.
elevation: MaterialStateProperty.all<double>(5.0),
padding
To give spacing between button border and content being displayed above it this property can be used. It accepts value of EdgeInsets via MaterialStateProperty.
padding: MaterialStateProperty.all<EdgeInsets>( EdgeInsets.symmetric( horizontal: 20.0, vertical: 15.0, ), ),
side
Using this parameter we can even customize border of a button being displayed on the mobile screen. Pass value of BorderSide class via MaterailStateProperty as below and see changes.
side: MaterialStateProperty.all<BorderSide>( BorderSide( color: Colors.yellow, width: 3.0, ), ),
shape
This parameter is an interesting one as it gives us so many options to be used to have different shapes for a button. See options below,
BeveledRectangleBorder
shape: MaterialStateProperty.all<OutlinedBorder>( BeveledRectangleBorder( borderRadius: BorderRadius.circular(20.0), ), ),
ContinuousRectangleBorder
shape: MaterialStateProperty.all<OutlinedBorder>( ContinuousRectangleBorder( borderRadius: BorderRadius.circular(20.0), ), ),
RoundedRectangleBorder
shape: MaterialStateProperty.all<OutlinedBorder>( RoundedRectangleBorder( borderRadius: BorderRadius.circular(20.0), ), ),
Circle Border
shape: MaterialStateProperty.all<OutlinedBorder>( CircleBorder(), ),
See, this is how this shape parameter changes shape of a material button with different representations.
So, these are all what we have for updated Flutter material buttons. We hope you learned something new! Stay tuned for our next how-to article.
Get a FREE quote on your project today!
Your idea is 100% protected by our Non-Disclosure Agreement
Related Posts
10 Essential Real Estate App Features that Enhance Your Business
Employee expense receipt management is the perfect process for RPA because it is logic based and redundant. Let’s
Guide To 7 Best Tech Stack 2023 for Software Development
Employee expense receipt management is the perfect process for RPA because it is logic based and redundant. Let’s
Why Outsource Java Development for Business Success in 2023
Employee expense receipt management is the perfect process for RPA because it is logic based and redundant. Let’s